数据导航器功能
如图T12.6所示,此上是按照版面中的数据文件来组织的。每个数据文件名称下,是使用该数据文件的绘图列表。现在我们将探讨上.
| 1. | 请把光标移到9 - Density(密度图)- TCellSample3.fcs compensated (APC-Cy7-A vs PE-Cy7-A)上,位于TCellSample3.fcs密度图中上如图T12.7中的光标所示。 |
这时会出现该二维绘图的一个缩略图,如图T12.7所示。这可快捷提醒您哪一个绘图是和这个数据文件相关联的,特别当绘图不可见时。这个方法适用于上.
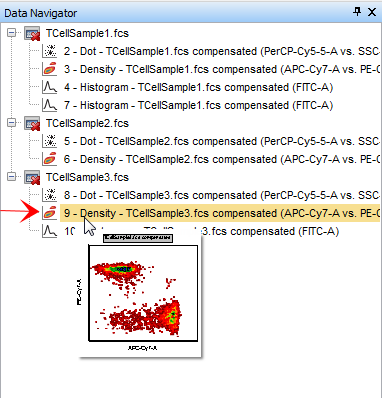
Figure T12.7 Thumbnail Image of a 2D Plot on the Data Navigator
我们将使用上来修改显示在二维绘图上的数据。我们将TcellSample1.fcs把版面右下方一维绘图的TCellSample1.fcs数据TCellSample2.fcsdata using just the上.
| 2. | 请把光标放到数据TCellSample2.fcs数据文件上让其高亮显示为蓝色,如图T12.8所示。 |
| 3. | 按下鼠标左键不放。 |
| 4. | 将数据TCellSample2.fcs拖到绘图列表7 -Histogram(柱状图) -TCellSample1.fcs compensated (FITC-A)上,如图T12.12中的光标和蓝色高亮所示。 |
| 5. | 当数据TCellSample2.fcs在列表7 -Histogram(柱状图) -TCellSample1.fcs compensated (FITC-A)上,. |
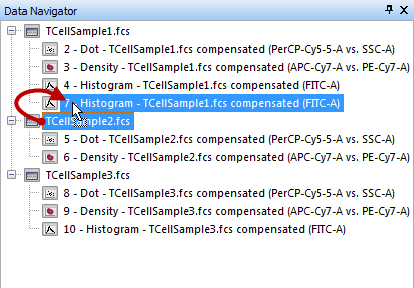
Figure T12.8 Dragging TCellSample2.fcs data file onto a 1D plot in the Data Navigator
此Select Drag and Drop Action Dialog (选择拖放操作对话框)将出现,如图T12.9所示。
| 6. | 选择替换绘图中已有的叠加图层(图T12.9)。 |
| 7. | 点击OK. |
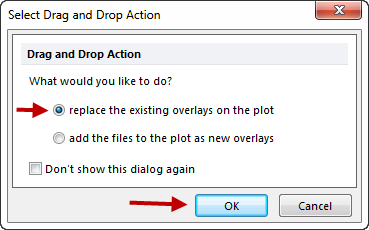
Figure T12.9 Select Drag and Drop Action Dialog
这时,版面中右下方的一维绘图处于选中状态(图T12.10中的绿色边框),并已更新为数据TCellSample2.fcs数据,边框显示为绿色,如图T12.10所示。
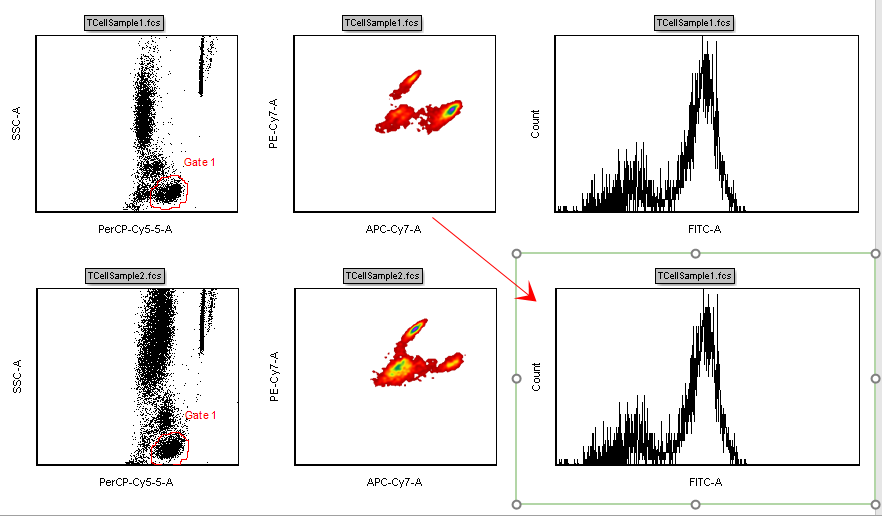
Figure T12.10 Selected and Updated 1D Histogram with TCellSample2.fcs Data
此上也进行了更新来反映所做的改动,如图T12.11所示。绘图7 -Histogram(柱状图) -TCellSample1.fcs compensated (FITC-A),显示在数据TCellSample2.fcs列表下方,如图T12.11中的光标和缩略图所示。
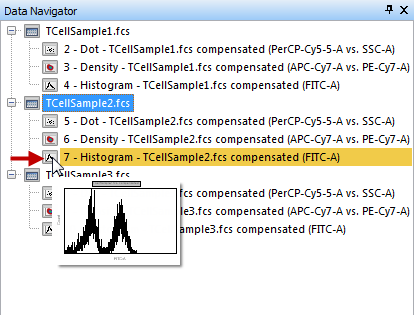
Figure T12.11 Data Navigator Updated to Reflect TCellSample2 Plot Changes
我们现在将在上中使用拖放操作,对一个柱状图添加叠加图层。
| 8. | 请把光标放到数据TCellSample2.fcs数据文件上让其高亮显示为蓝色,如图T12.8所示。 |
| 9. | 按下鼠标左键不放。 |
| 10. | 将数据TCellSample2.fcs拖到柱状图列表4 -Histogram(柱状图) -TCellSample1.fcs compensated (FITC-A),如图T12.12中的光标和蓝色高亮所示。 |
| 11. | 当数据TCellSample2.fcs在柱状图列项上时,松开鼠标。 |
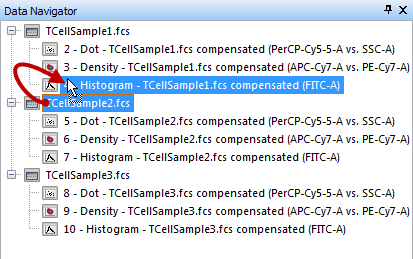
Figure T12.12 Dragging TCellSample2 onto a Histogram Plot in the Data Navigator
此Select Drag and Drop Action Dialog (选择拖放操作对话框)将出现,如图T12.9所示。但这次,我们将更改我们的选项,从而允许在柱状图上叠加数据。
| 12. | 选择“把文件作为新的叠加图层添加到绘图中". |
| 13. | 点击OK. |
这时,在版面右上方的柱状图也进行了更新,来反映TCellSample2.fcs数据对应的叠加图层。该柱状图显示于图T12.13中的绿色边框中,新的叠加图层数据显示为红色。
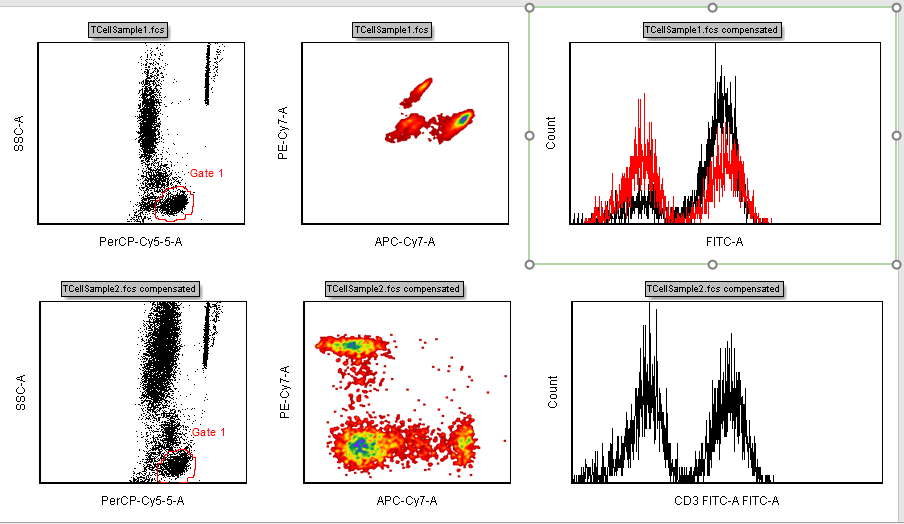
Figure T12.13 Histogram Updated to Show the Overlay of TCellSample2 Data
再次,上再次进行了更新,来显示这些修改,如图T12.14所示。在数据TCellSample2.fcs现在,出现一个列表4 -Histogram(柱状图) -TCellSample1.fcs compensated (FITC-A),如图T12.14中的光标和缩略图所示。子列表Overlay 2(第二个叠加图层)会出现在柱状图的列表中,来表明数据TCellSample2.fcs是TcellSample1.fcs的第三层叠加。注意:在TcellSample1.fcs数据文件列表下,柱状图4 -Histogram(柱状图) -TCellSample1.fcs compensated (FITC-A),列表与子列表Overlay 1(第一个叠加图层)也被更新表明数据ApoMono.001是基础数据。
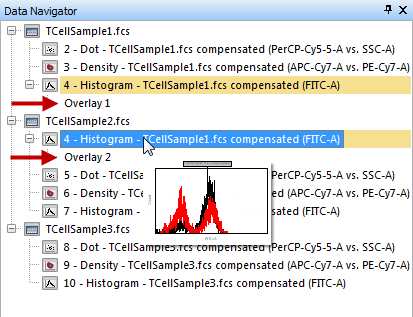
Figure T12.14 Updated Data Navigator with Overlay of TCellSample2 Data
所有之前介绍的在上中进行的拖放数据的操作,也可以使用上的弹出窗口完成。我们将使用上的弹出窗口来为版面中右上方的柱状图再添加数据作为一个叠加。
| 14. | 将光标放在TCellSample3.fcs密度图数据文件列表上,如图T12.15中的蓝色高亮文件所示。 |
| 15. | 请右键点击,调出相关的弹出菜单。 |
| 16. | 选择Copy(复制),如图T12.15中的光标所示。 |
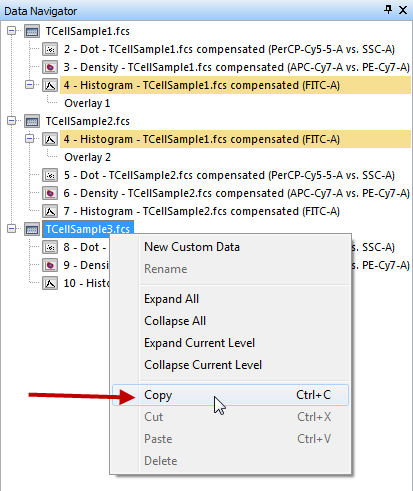
Figure T12.15 Copy Using Data Navigator Pop-up Menu
| 17. | 请将光标放在列表4 -Histogram(柱状图) -TCellSample1.fcs compensated (FITC-A),该列表在TcellSample1.fcs数据下的上,如图T12.15中的蓝色高亮文件所示。 |
| 18. | 请右键点击,调出相关的弹出菜单。 |
| 19. | 选择Paste(粘贴),如图T12.16中的光标所示。 |
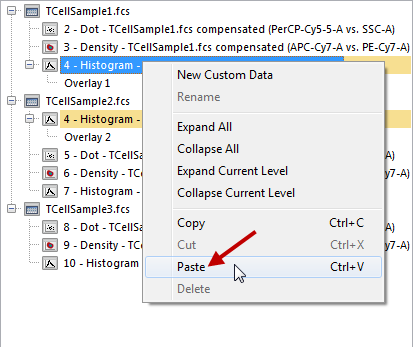
Figure T12.16 Paste Using Data Navigator Pop-up Menu
此Select Drag and Drop Action Dialog (选择拖放操作对话框)将出现,如图T12.9所示。但这次我们将修改对话框中的选项,允许在柱状图上覆盖数据。
| 20. | 选择“把文件作为新的叠加图层添加到绘图中". |
| 21. | 点击OK. |
这时,在版面右上方的柱状图也进行了更新,来显示ApoMono.003数据对应的叠加。柱状图显示在绿色边框中,新的叠加数据显示为蓝色,如图T12.17所示。
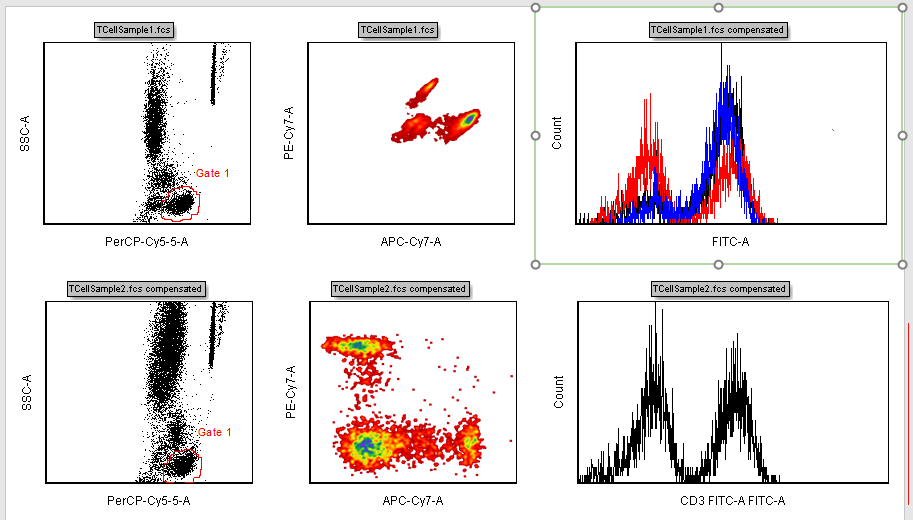
Figure T12.17 Histogram Updated to Show the Overlay of TCellSample3 Data
再次,上也会再次更新,来反映这些修改,如图T12.18所示。在TCellSample3.fcs密度图现在,出现一个列表4 -Histogram(柱状图) -TCellSample1.fcs compensated (FITC-A),如图T12.18中的光标和缩略图所示。子列表Overlay 3(第三个叠加图层)会出现在柱状图的列表中,来表明TCellSample3.fcs密度图是柱状图TcellSample1.fcs的第三层叠加。
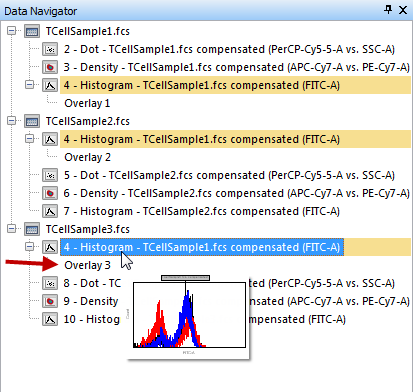
Figure T12.18 Updated Data Navigator with Overlay of TCellSample3 Data
我们可以从上中拖拽数据,来替换或叠放版面页上绘图中数据。
我们现在将从上中把一个数据文件拖放到版面中的一个绘图上。在版面中,点状图SSC-A vs.PerCP Cy5.5-A,在页面1的左下角,使用的是数据TCellSample2.fcs。我们将用TcellSample1.fcs数据来覆盖该数据。
| 22. | 请把光标放到TcellSample1.fcs数据文件上让其高亮显示为蓝色,如图T12.19所示。 |
| 23. | 按下鼠标左键不放。 |
| 24. | 将数据文件TcellSample1.fcs拖到版面上。 |
| 25. | 当TcellSample1.fcs数据文件在页1左下角的SSC-A vsPerCP Cy5.5-A点状图上时,放开鼠标。此时光标和绘图边框显示为蓝色,如图T12.19所示。 |
| 26. | 在Select Drag and Drop Action(选择拖放操作)窗口,选择“把文件作为新的叠加图层添加到绘图中. |
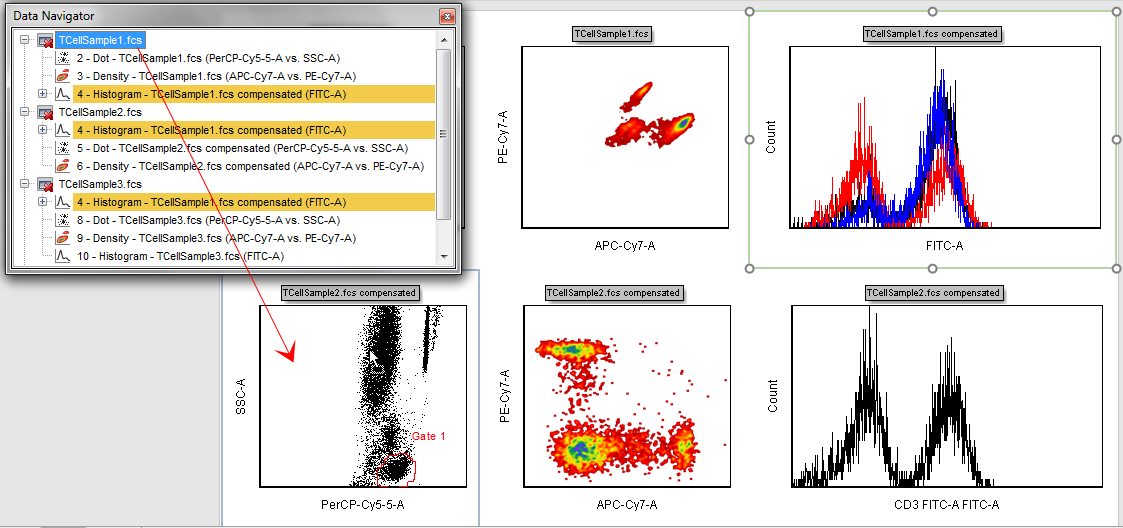
Figure T12.19 Dragging and Dropping TCellSample1 from the Data Navigator onto the Dot Plot on the Layout
此时,版面左下角的两个点状图和上都做了更新,来反映数据的更改,如图T12.20所示。图T12.20中的光标和缩略图显示了上.

Figure T12.20 Updated Layout and Data Navigator with TCellSample1 Overlay
除了从上中拖拽数据文件到版面中的点状图上之外,我们也可使用上的弹出菜单来复制数据对象,然后利用版面的弹出菜单来将数据粘贴到点状图中。和其他弹出菜单一样,上的弹出菜单也是通过右键点击调出的,只需将光标放置在上我们将使用上弹出菜单来在版面中插入一个新的数据绘图。
| 26. | 将光标放在TCellSample3.fcs密度图数据文件上. |
| 27. | 请右键点击,调出相关的弹出菜单。 |
| 28. | 选择Copy(复制),如前图T12.15所示。 |
| 29. | 点击版面底部的页2,如图T12.21所示。 |

Figure T12.21 Selecting Page 2
这时会出现版面中的第2页,如图T12.22所示。
| 30. | 请把光标放在版面中一个空白区。 |
| 31. | 请右键点击,调出相应的弹出菜单,如图T12.22所示。 |
| 32. | 选择Paste(粘贴)命令。 |
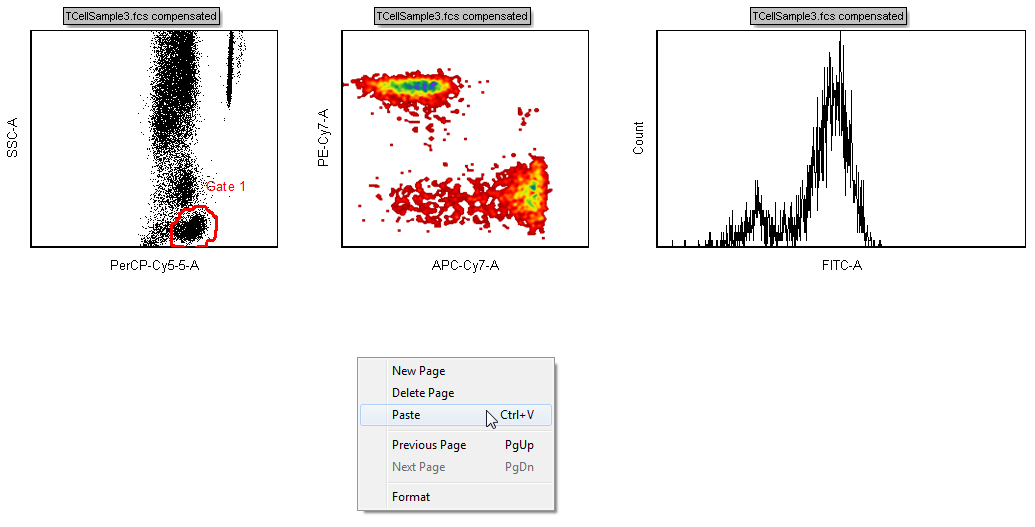
Figure T12.22 Page 2 of the Layout with the Pop-up Menu
此Select Plot Types(选择绘图类型)对话框将出现,如图T12.23所示。
| 33. | 选择Density(密度图)作为要打开的绘图类型(图T12.23)。 |
| 34. | 点击OK. |
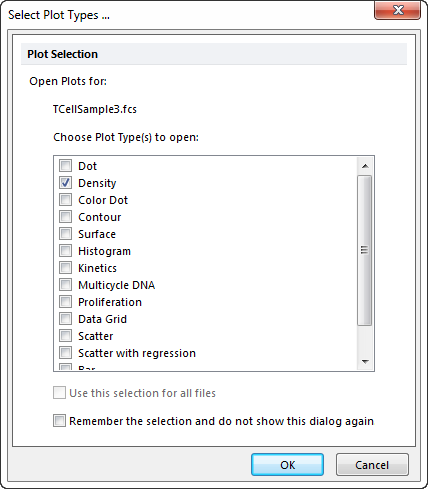
Figure T12.23 Select Plot Types... Dialog
一个TCellSample3.fcs密度图就出现了,使用的是默认参数Time vs.FSC-H,如图T12.24所示。可对该绘图按照您的意愿进行格式修改。
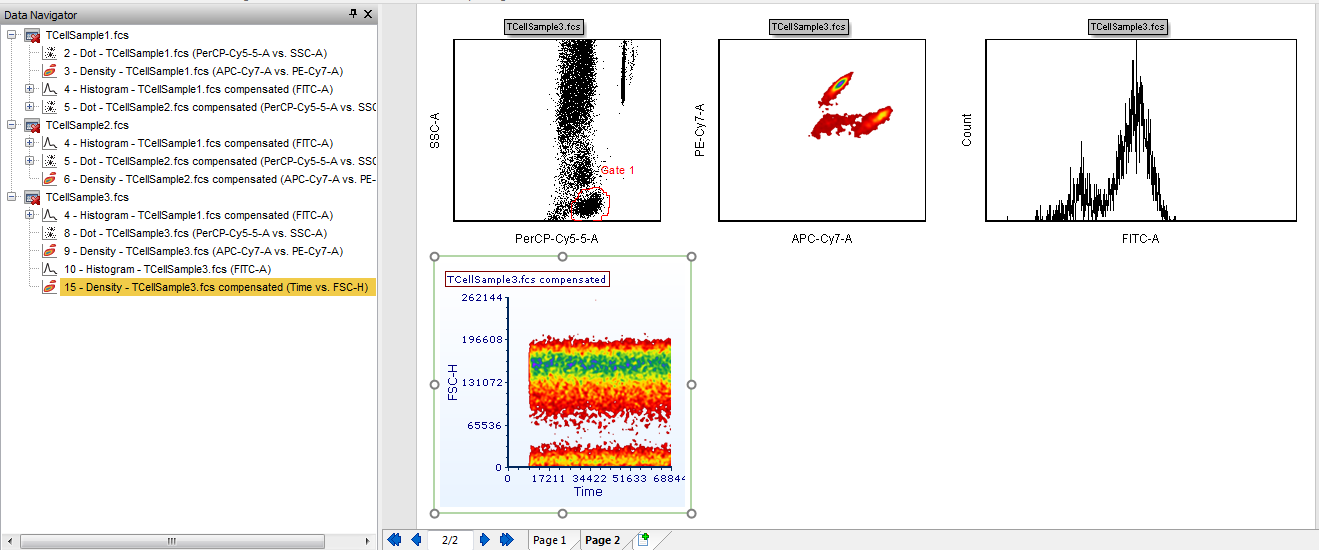
Figure T12.24 Contour Plot of TCellSample3.fcs Data
