To undock a window:
| 1. | Place the cursor on the top border of the docked Gate Navigator, which is docked on the bottom of the layout. |
| 2. | Press and hold the left mouse button while dragging the Gate Navigator up and away from its current docked location. |
| 3. | Release the mouse button when the Gate Navigator is at the desired location. Be sure the cursor is not on any of the docking icons. |
To undock the docked windows that are using Auto Hide, we need to first turn off the Auto Hide feature; there are two ways of doing this.
| 4. | Move the cursor over the Data Navigator tab to make the docked Data Navigator visible. |
| 5. | Click on the Auto Hide icon in the upper right corner of the docked Data Navigator, as previously shown in Figure T11.11, to turn off the Auto Hide feature. Alternatively, |
| • | Place the cursor on the top border of the docked Data Navigator. |
| • | Right-click to bring up the associated pop-up menu. |
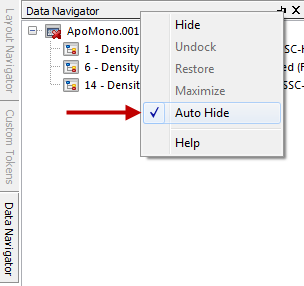
| • | Deselect Auto Hide from the pop-up menu, indicated by the cursor in Figure T11.21. |

Figure T11.21 Removing Auto Hide using the Pop-up Menu
The Auto Hide feature has now been turned off for all three docked windows, and they can now be undocked.
| 6. | Right-click on the top border of the docked Data Navigator to bring up the associated pop-up menu. |
| 7. | Select Undock from the pop-up menu. |
Alternatively, the docked windows can be undocked by dragging and dropping them back onto the layout as previously shown.

