Creating Alerts
To create an Alert:
1. Click on the Quality→Alerts→Alerts command to bring up the dockable Alerts window.
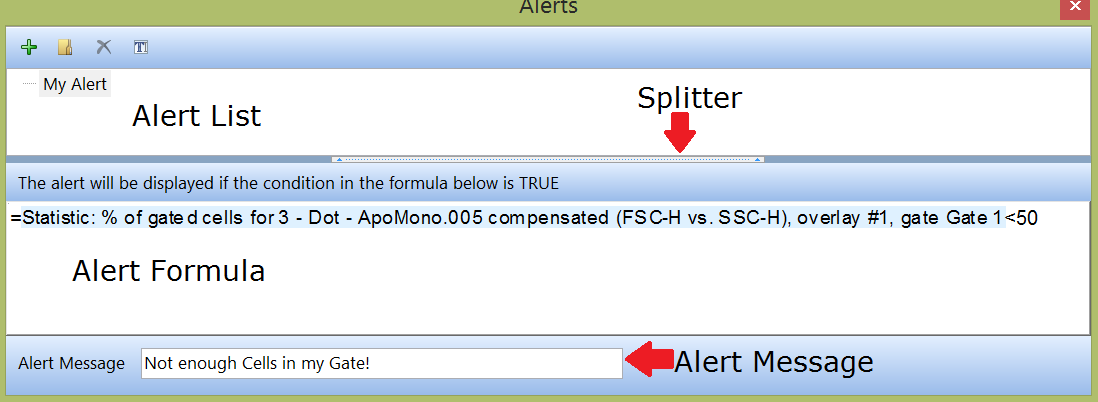
2. Make sure that the Alerts window is docked to the left or right of the screen so that all panels of the window are visible (Figure 23.1). The three areas of the Alerts window are the: Alert List, Alert Formula Editor, and Alert Message. The list and formula areas are separated by a splitter which can be moved to resize the areas.

Figure 23.1 Docked Alert Window
3. Click on the ![]() (Add) icon.
(Add) icon.
4. Give the New Alert a unique name.
5. Click on the Alert name in the list so that it is highlighted.
6. Enter or edit the formula:
•Right-click the formula area and select Insert Token from the pop-up menu.
•Choose a token from the Insert a Token dialog.
•Modify the formula so that it evaluates to a TRUE or FALSE statement. You can use any of the operators and functions that are available for custom tokens. Examples of two formulas correct formulas are shown in Figure 23.2. Example 1 is a formula that will evaluate whether the number of events in the Upper Left Quadrant of Plot #3, Overlay #1 is greater than 2000. Example 2 is a formula what will evaluate whether the percentage of gated cells on Plot #3, Overlay #1 is between 15% AND 50%.

Figure 23.2 Examples of Alert Formulas
7. Enter the text to be shown if the alert condition is met in the Alert Message edit field at the bottom of the window.
The icon buttons in the Alerts window are explained in the table below.
Icon Button |
Explanation |
|---|---|
|
Add a new Alert. |
|
Create (and name) a new folder to manage Alerts. Drag & Drop Alerts into the folder once it has been created. |
|
Delete the selected item. Note: You can undo a delete by immediately clicking Undo in the Quick Access Tool Bar. |
|
Rename the currently selected item. |
