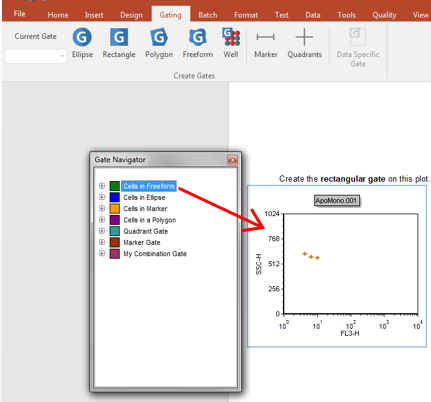
Gate Navigator
The Gate Navigator shows a hierarchical view of the gates that have been defined in your layout, the plots on which those gates have been applied, and data files the gates or Data Specific Gates are applied to (Figure 4.34). Any action that can be completed in the Gate View (i.e. change hierarchies, edit gate information, and apply gates via drag and drop) can be accomplished with the Gate Navigator except that the Gate Navigator is a separate dockable window rather than an insertable object as is the Gate View. Moreover the Gate Navigator can be used to:
•Work with and view Data Specific Gates and Data Specific Gate Groups
•Change plot names (For plots, the name property is the name of the plot to display in lists (Format→General options) where the user is required to select a plot. The name is also used when displaying objects in different Navigators)

Figure 4.34 Gate Navigator
The first level of hierarchy in the Gate Navigator represents the gates defined in your layout. The second level is the plots using those gates. Hovering the mouse cursor over a plot in the docked Gate Navigator window displays a thumbnail view of the plot.
Double clicking on a gate node will launch the Edit Gate dialog where gate information can be changed or updated.
Click on a node to select it. While holding the mouse button down, drag the node to your layout and release the mouse button. The results of drag and drop operations are described in the table below.
Drag and Drop Operation |
Function |
|---|---|
Drag a gate to a plot in the layout (or to a plot within the Gate Navigator). |
Applies the gate to the plot. |
Drag (or Copy & Paste, or Cut & Paste) a plot (in the layout or within the Gate navigator) onto a gate of the Gate Navigator. |
The target gate will be made Data Specific for the dragged data. If Cut is used, the cut plot will be removed. |
Drag (or Copy & Paste, or Cut & Paste) a plot to an empty part of the layout. |
A copy of the plot will be created in the new location. If Cut is used, the cut plot is removed. |
Drag a plot onto a plot in the layout (or to a plot within the Gate Navigator) |
Adds the appropriate data to the existing object. If the target plot supports overlays, the action brings up a Paste Special dialog to insert data or overlays. If the target plot does not support overlays, the data loaded in the dragged plot is loaded in the target plot. |
Copy and Paste (or Cut and Paste) a plot from the Gate Navigator onto a plot in Edit mode within the layout |
Adds data to the plot. If the target plot supports overlays, the action brings up a Paste Special dialog to insert data or overlays. If the target plot does not support overlays, the data loaded in the dragged plot will be loaded in the target plot. When Cut is used, the cut plot is removed from the Data Navigator. |
Drag and drop a gate to a different position within the Gate Navigator |
The gate is moved into the new position in the hierarchy. |
Note: The Gate Navigator is a complementary tool to the Gate View. The gate view allows similar functionality in terms of dragging and dropping to/from plots, but allows additional gating functionality.
The Gate navigator window can be formatted in order to display or not display plots on which those gates have been applied as well as data files the Data Specific Gates are applied to.
To format the Gate Navigator:
1. Right click on any empty part of the Gate Navigator window.
2. Select Format from the right-click menu. A Formatting Gate Navigator window with the following options will open:
•Create plot navigator items. Flag this item to display plots on which gates have been applied within the gate navigator window.
•Show data specific gates. Flag this item to display data specific gates within the gate navigator window.
