Features of a Docked Window
Once a window is docked it can be resized, undocked, redocked to a new location, and you can Auto Hide it. Note that when a layout is saved, the corresponding docking configuration is also saved with the layout, so that it will be reloaded when you load the layout. We will now explore the various features of a docked window.
1.Place the cursor on the top border of the docked Gate Navigator.
2.Press the left mouse button and continue to hold it while dragging the Gate Navigator to a new location on the layout.
As you move the Gate Navigator on the layout docking icon arrows appear on the four outer sides of the layout, indicated by the red circles in Figure T11.6. If you continue to move the Gate Navigator towards the middle of the layout the central docking icon will re-appear, as previously shown in Figure T11.3.
Figure T11.6 Four Outer Docking Icon Arrows Circled in Red
3.Continue to hold down the mouse button and move the Gate Navigator towards the bottom docking arrow.
4.Release the mouse button when the cursor is on top of the bottom docking arrow, as indicated by the red circle in Figure T11.7.
Notice that a blue rectangle appears at the bottom of the layout, again to indicate the proposed docking location for the window.
Figure T11.7 Bottom Docking Icon Arrow
The Gate Navigator is now docked at the bottom of the layout, as shown in Figure T11.8. However, the current size of the docked Navigator is too large and covers part of the plots on the layout. We will now resize the docked window to a more appropriate size.
Figure T11.8 Gate Navigator Docked at the Bottom of the Layout
5.Place the cursor over the top border of the docked Gate Navigator.
6.Move the cursor slightly until it changes to a resizing icon (two horizontal lines with an arrow on either side of the lines facing outward), indicated by the red circle in Figure T11.8.
7.Press the left mouse button and continue to hold it while dragging the border of the Gate Navigator down.
8.Release the mouse button when the docked Gate Navigator is no longer covering the plots on the layout.
Rather than resize the docked Navigator, we could use the Auto Hide feature. Auto Hide allows the window to remain docked, but hidden, except for a visible tab with the name of the docked window on it. When the cursor is placed on the tab the docked window re-appears and remains visible as long as the cursor remains on the docked window. If the cursor is moved off the docked window then the window is again hidden.
9.Click on the Auto Hide icon from the upper right corner of the docked Gate Navigator, indicated by the cursor in Figure T11.9.

Figure T11.9 Auto Hide Icon
10. Move the cursor off the docked Gate Navigator.
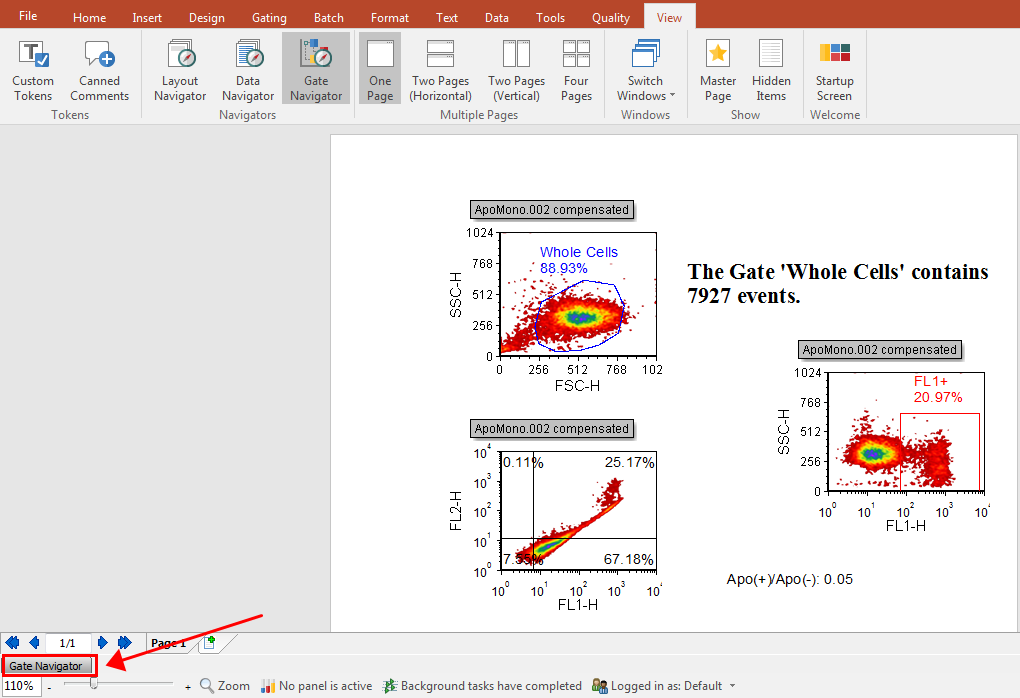
The docked Gate Navigator is now hidden on the layout, except for a tab on the bottom of the layout, indicated by a red circle in Figure T11.10.

Figure T11.10 Gate Navigator Hidden using the Auto Hide Feature
11. Move the cursor over the Gate Navigator tab, indicated by the red circle in Figure T11.10.
The docked Gate Navigator will now reappear. We will now remove the Auto Hide feature so that the Gate Navigator will remain visible.
12. Click on the Auto Hide icon located in the upper right corner of the docked Gate Navigator, indicated by the cursor in Figure T11.11, to remove the Auto Hide feature from the docked window.
Note that the Auto Hide icon has changed from its original design, shown in Figure T11.9, to the design shown in Figure T11.11. The Auto Hide design, shown is Figure T11.11, indicates that the Auto Hide feature is on. However after clicking on the Auto Hide icon it will go back to the original design, shown in Figure T11.9, which indicates that the Auto Hide feature is off. The Gate Navigator is now visible, docked at the bottom of the layout.
Figure T11.11 Removing Auto Hide
In the next section, we will continue using the Docking.fey layout and cover docking features with multiple windows docked.
