Selecting Items on a Page
To work effectively with objects/items in FCS Express, you must understand the difference between edit mode and selected mode.
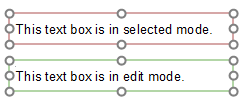
In order for an object to be manipulated, the object must first be selected. A red border surrounding the object denotes that it is selected. Only selected items can be moved, resized, deleted, etc.
In order to edit items within an object, the object must first be in edit mode. For example, to modify a gate, the plot containing the gate must be in edit mode. When an item is in edit mode, it displays a green border.
Figure 4.35 shows one item in selected mode and one item in edit mode.

Figure 4.35 Selected and Edit Modes
Many items can be selected at the same time, but only one item can be in edit mode at one time.
To put an object into edit mode, click anywhere within the interior of the object. A green border will appear around the object signifying that it is in edit mode. If an object is in edit mode, but does not contain any items that can be selected, the object will behave as if it is in selected mode. For more information on editing items contained within a plot, refer to the following sections: Adding a Text Box to a Plot, Using Gates, and Using Markers.
To put a single item into selected mode, move the cursor over the border of the item. The cursor will change to a 4-headed arrow ![]() . Click the border once. A red border will be displayed around the item indicating that the item has been selected. Alternatively, you can put an item directly into selected mode by holding down the Shift key while clicking anywhere on the item.
. Click the border once. A red border will be displayed around the item indicating that the item has been selected. Alternatively, you can put an item directly into selected mode by holding down the Shift key while clicking anywhere on the item.
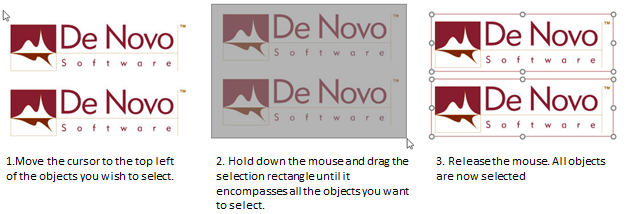
There are two methods for selecting multiple specific items at the same time. The first method uses a click and drag feature (Figure 4.36). If the items for selection are located near one another on a page, draw a rectangle around all of the items to be selected. Press and hold down the mouse button at the top left of where you want the rectangle to be, then drag the cursor down and to the right. The point that you release the button will be the bottom right corner of the rectangle. All items inside this area will now be selected (so that they may be manipulated together).

Figure 4.36 Selecting Multiple Objects with Click and Drag
The second method of selecting multiple specific items is useful when the items are not located in close proximity to one another. Once the first item has been selected as a single item, place the cursor anywhere over the next item you wish to select. Press and hold the Shift key while clicking. The second item should now have a red border. Continue the Shift-Click selection process for each additional item you wish to select. Once multiple objects have been selected, they can be copied, cut, resized, moved, and aligned simultaneously as explained in the sections below.
If you want to select all of the items on the current page, use Home→Editing→Select All. Alternately, press Ctrl+A.
Clicking outside the selected item(s) will deselect them and put them in a neutral state (no red or green border).
