Manual Snapshots
The Manual Snapshots navigator allows the user to easily save/apply/organize Manual Snapshots and can be opened from the Batch & Export tab→Snapshots category→ Manual Snapshots  .
.
Note: Snapshots may also be created automatically by using Iteration Snapshots.
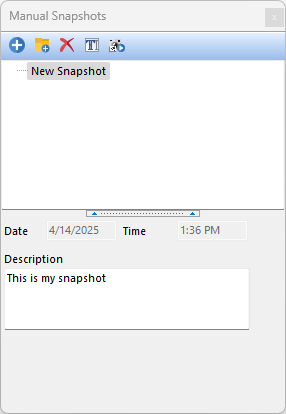
The Manual Snapshots navigator (Figure 9.4) includes the following options:
•Create a new Snapshot - Creates a new Manual Snapshot of the current gate, marker, and quadrant positions.
•Create a new Folder - Creates a new folder in the Manual Snapshot navigator to organize Manual Snapshots from the analysis.
•Delete - Deletes the selected Snapshot in the navigator.
•Rename the selected Snapshot - Renames the selected Manual Snapshot in the navigator.
•Apply Snapshot - Applies the selected Manual Snapshot to the layout. This option is depicted by the camera icon.
•Snapshot Date and Time - Records the Date and Time that a Manual Snapshot of the layout was created.
•Description - Allows the user to describe the selected Manual Snapshot

Figure 9.4 - Manual Snapshots Navigator
To create a Manual Snapshot on a layout containing plots and data:
1. Open the Manual Snapshots navigator.
2. Position any gates, markers, or quadrants as you would like.
3. Click on the blue plus ![]() button to create a new Manual Snapshot.
button to create a new Manual Snapshot.
4. Enter a name for the Snapshot in the Snapshots navigator.
The position of the gates, markers, and quadrants on the layout are now saved within the Manual Snapshot you have created.
To create multiple Manual Snapshots:
5. Repeat steps 1-4 above and give the new Snapshot(s) a name (Sample 1, Sample 2, and Sample 3 in Figures below). An unlimited number of Snapshots may be created and / or organized using the folder icon (tooltip: "Create a new folder"). Once a folder is created you may drag and drop any existing Snapshots into and out of the folder.
To apply a stored Manual Snapshot after the above steps 1-4 have been completed,
6. In the Manual Snapshots navigator, highlight the Manual Snapshot that you intend to apply .
7.Within the navigator, click the Apply Snapshots button ![]() (indicated by a red arrow in the figures below).
(indicated by a red arrow in the figures below).
a. Alternatively, drag the snapshot name from the Manual Snapshot navigator to a blank space on the layout and drop it.
b. Note in the figure below that "Sample 2" has been applied, automatically changing the Gate positions, the Marker position, and the position and type of Quadrant.

Sample 1 from the Manual Snapshot navigator is applied to the layout. Note the position of Gate 4, the position of M1, and the position and style of the Quadrants.

Sample 2 from the Manual Snapshot navigator has now been applied to the layout. Note the changes of the position of Gate 4, the position of M1, and the position and style of the Quadrants.
