Formatting Tables
If you click the cursor in one of the cells of a table (or select a group of cells by dragging the cursor across the cells you want to highlight), you can choose formatting options by one of the following methods:
•Select one of the commands from the Text→Table group.
•Right-click while the cursor is in the table, select Table from the first pop-up menu, and choose a command from the submenu.
The table below shows the formatting commands that are available.
Command |
Explanation |
|---|---|
Insert Row Above |
Insert a row above the cell where the cursor resides. |
Insert Row Below |
Insert a row below the cell where the cursor resides. |
Insert Column to the Left |
Insert a column to the left of the cell where the cursor resides. |
Insert Column to the Right |
Insert a column to the right of the cell where the cursor resides. |
Delete Rows |
Delete the current row or the selected rows. |
Delete Columns |
Delete the current column or the selected columns. |
Table Properties |
Opens a menu used to set general table properties, as well as set properties for the selected rows and cells (see below). |
Merge Cells |
The text from all selected cells will be merged into one cell. This command is only available through the pop-menu. |
Split Cells |
The cell(s) will be split into multiple cells. This command is only available through the pop-menu. |
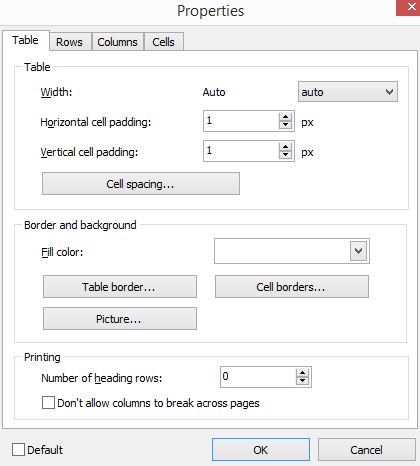
The Table Properties windows is divided in 4 tabs (Figure 5.165):
•Table
•Row
•Columns
•Cells

Figure 5.165 - The Table Properties window.
Table tab. These settings apply to the whole table.
•Width. Set the table width in pixels or as a percentage of Text Box width. (Note: Most users find changing the width of individual columns works better than using this option to determine table width.)
•Cell padding. Set the amount of space between the text of a cell and its border.
•Cell spacing. Set the amount of space between cells.
•Fill Color. Choose the background color of the table.
•Table Border. Set the color and width of the table border (the outer frame of the table).
•Cell Border. Set the color and width of the individual cell borders.
•Picture. Load a picture as the background of the table.
•Printing. Allows you to choose a number of heading rows depending on your needs. Allows you to choose to not to allow columns to break across pages during printing.
Rows tab. These settings allow to customize the vertical alignment of the text (Top, Center, Bottom), printing, and cell colors of the selected row(s).
Columns tab. These settings apply to the cell colors and banding of the selected column(s).
Cells tab. These settings apply to the selected cell(s).
•Preferred width. Set the width of the current or selected cells.
•Height at least. Set the height of the current or selected cells.
•Vertical alignment. Set the vertical alignment of the current or selected cells. (Note: To align a full Row, use the Table Properties - Rows Tab).
•Rotation. Set the rotation of the current or selected cells.
•Fill Color. Set the background color of the current or selected cells.
•Picture. Load a picture as the background of the current or selected cells.
•Border. Set the color of the current or selected cell borders.
•Visible Border Sides. Defines which border sides should be visible.
