Formatting Text Box Properties

Contents
In addition to formatting the text within a text box, the properties of the text box itself (e.g., size, background color, and border style) can also be formatted.
In the course of this example, we will:
•Change the border.
•Change the size.
•Change the background.
We will continue using the same layout we were using in the previous section.
To format the Text Box properties:
1.Right-click in the text box from Figure T5.6.
2.Select Format from the pop-up menu (Figure T5.9).

Figure T5.9 Selecting Format from the Pop-up Menu
The Formatting dialog will appear docked to right of layout. There are five categories:
A.General – To change the name of a text box.
B.Size – To change the size of a text box.
C.Fill – To change the background of the text box.
D.Border/Line – To change or add a border to a text box.
E.Authorizations – To control when objects may be selected or edited.
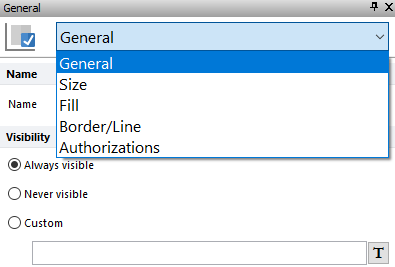
Figure T5.10 Formatting Text Box Dialog
To Modify the Border:
1.Select the Border/Line category in the Formatting dialog (Figure T5.11).
2.Select 1.00 points from the Width spin control (Figure T5.11, ![]() ).
).
3.Select Solid Line (second option) from the Style drop-down list (Figure T5.11, ![]() ).
).
4.Select Black from the Color drop-down list if necessary (Figure T5.11, ![]() ).
).

Figure T5.11 Formatting Text Box Border
5.Click on the layout to remove the selection highlighting from the text box.
The text box should now look like Figure T5.12 (Right panels).

Figure T5.12 Text Box with Border
To Modify the Size:
1.Select the Size category in the Formatting dialog (Figure T5.10). From this category, you can change you can change the dimensions of the text box.
2. Check box next to Lock Aspect Ratio (Figure T5.13, ![]() ). This will maintain the ratio of the text box size relative to the original text box.
). This will maintain the ratio of the text box size relative to the original text box.
3.Change the Height to 2.00 inches (Figure T5.13, ![]() ).
).

Figure T5.13 Formatting Text Box Size
4.Click on the layout to remove the selection highlighting from the text box.
The text box should now look like the 'After' image on the right of Figure T5.14.

Figure T5.14 Modified Text Box Size
To Modify the Background of a text box:
1.Select the Fill category of the Formatting dialog (Figure T5.10). You can change the background of the text box here. The default is a solid white background.
2.Select Gradient for the background (Figure T5.15, ![]() ).
).
3.Change the Start Color to Blue (Figure T5.15, ![]() ).
).
4.Change the End Color to Sky Blue (Figure T5.15 ).
5.Change the Direction to Right to Left (Figure T5.15 ![]() ).
).

Figure T5.15 Formatting Text Box Fill
The resulting image should now look like the image on the right of Figure T5.16.

Figure T5.16 Text Box with New Background
Select File tab→Close to close this layout with or without saving as you prefer.
Next, we will insert and modify a table.