ImageJ for FCS Express Knowledge Base
Workflow for analyzing ImageJ data in FCS Express
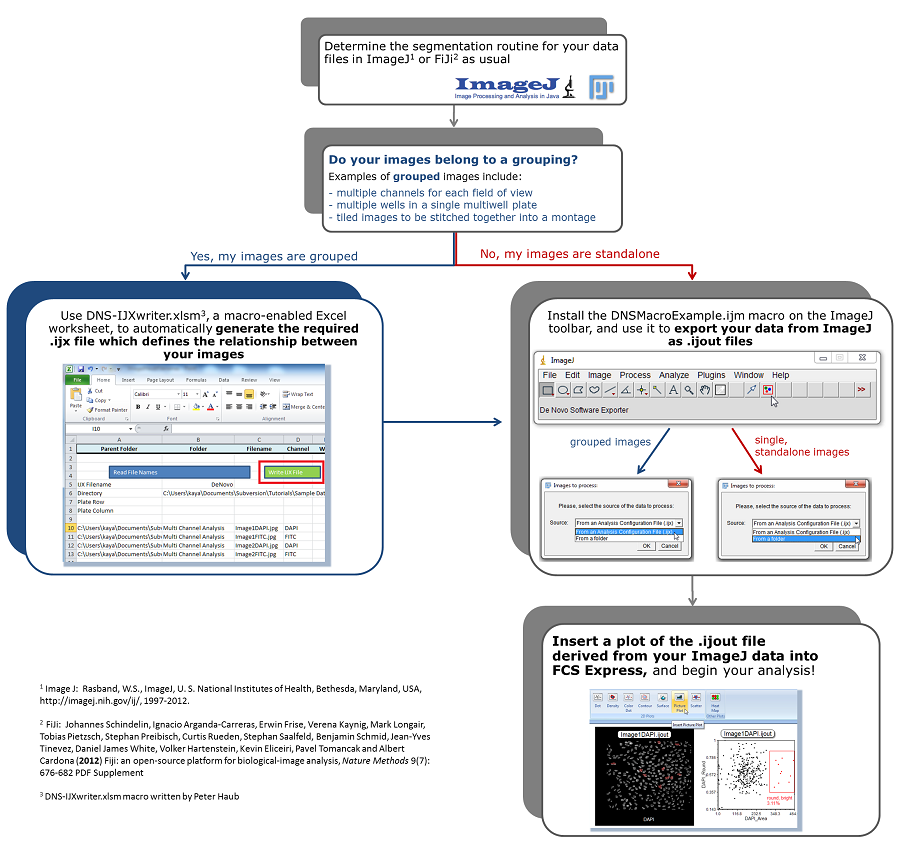
The flowchart below indicates how the DNSMacroExample.ijm macro can be used to export ImageJ data as .ijout files readable by FCS Express (Figure T27.22). The DNS-IJXwriter.xlsm macro (written by Peter Haub) can be used to define the relationship between grouped images.

Figure T27.22 Workflow for Analyzing Single or Grouped Images Processed in ImageJ within FCS Express
ImageJ Macros for use with FCS Express can be downloaded from https://denovosoftware.com/faq/kb-how-do-i-use-imagej-with-fcs-express/#macros.
Macros are installed in ImageJ with the following steps:
1. Open ImageJ
2. Click on Plugins→Macros→Install or press control+shift+M
3. Navigate to the location of the macro
4. Click Open.
The macro will now be installed in the ImageJ tool bar. For more help with ImageJ Macros, please see the ImageJ website at http://rsbweb.nih.gov/ij/index.html.
Folder Structure and File Naming
File Names
The DNSExampleMacro will name any exported file names (.ijout files) and folder names with the name of the original image. For instance, if your original image was named DapiImage#1.tif, the resulting ImageJ export file will be named DapiImage#1.ijout and a folder will be created name DapiImage#1 that contains a .results.txt file named DapiImage#1.results.txt and a mask image named DapiImage#1.mask.tif. Note that the name of the .ijout file and the folder that contains the results must always be the same.
Loading Files (Folder Structure)
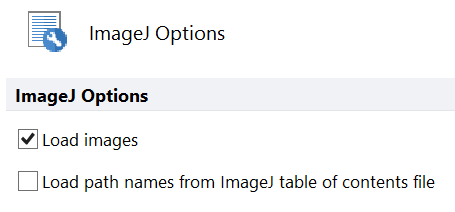
Access user options for how to load data from File tab→Options→ expand Data Loading category→ImageJ Options (Figure T27.23).

Figure T27.23 ImageJ Data Loading Options in FCS Express Image Cytometry or Plus
Choosing Load images will determine if you want to load just raw data (Load images unchecked), or raw data plus the original images (Load images checked).
"Load path names from ImageJ table of contents file" indicates that you would like to load the data files with the absolute file path that was determined at the time of exporting the data from ImageJ. If you have subsequently moved the data files or folder containing the data you will need to uncheck this button. To work with data without loading the path names from the ImageJ table of contents file, the following files must be within the same folder at the same level as in Figure T27.24 below:
•The original image (DNAImage1.jpg below)
•The exported .ijout file (DNAImage1.ijout below)
•The folder containing the .results.txt file and the .mask.tif file (DNAImage1 folder below)

Figure T27.24 All Files Which Must Be Kept within Same Folder as .ijout File: Original Image, .txt Results, and .tif Mask Files
Note that the name of the .ijout file and the folder that contains the results must always be the same. Multiple segmentations, and therefore multiple .ijout and results folders may also be generated from the same images. In the case of running multiple segmentations the same set of original images may be used without duplicating the image data set.
Working with Plate Based Data:
If the .ijx file represents a plate, the lines of the file that are related to a well must be grouped consecutively. For example, if the file is about a plate with wells D05 and H04, all the channels for well D05 must be in a group of lines, followed by another group of lines with the channels of well H04.
If the ijx file represents a plate, the last line must have the plate information, starting at column 1 with a # and the words "Plate Info." Then, it is expected a field with the constant 'Rows', the number of rows in the plate, the constant field 'Columns', and the number of columns of the plate. For example, #Plate Info,Rows,8,Columns,12 . See Figure T27.25 for an example.

Figure T27.25 .IJX Analysis Configuration File for 96-Well Plate Assay - Two Wells and Two Image Channels Per Well
The name of the .ijx schema can be customized. At the bottom of the DnsAnalysisCreator.ijm you will find:
// This function returns the name of the automatically generated .ijx file.
function getExporterFilename() {
return "FileListForDnsExporter";
Modify the text in "return "XXXX"; where the X's represent the desired file name to be entered, similar to above.
If this macro file is installed in ImageJ (Plugins→Macros→Install), a blue rectangle with the hint "De Novo Software Analysis Configuration File Creator" will be shown in the toolbar (Figure T27.26).

Figure T27.26 ImageJ Toolbar with the DnsAnalysisCreator.ijm Macro Installed
