Applying Gates(应用门)
在以上的几个例子中,我们已经创建了几个门。现在我们来学习如何把它们应用到绘图上。
在本例中,我们会:
| • | 从格式窗口应用门。 |
| • | 从门操作标签卡上应用门。 |
| • | 从门导航器上应用门。 |
我们会继续使用一直在用的这个版面。以下的数字编号对应于图T4.21。
| 1. | 在已有"Whole Cells(所有细胞)"门的绘图上点击鼠标右键。 |
| 2. | 从弹出菜单中选择Format(格式)选项。 |
| 3. | 选择Overlays(数据层)类别选项 |
| 4. | 将Gate(门) |
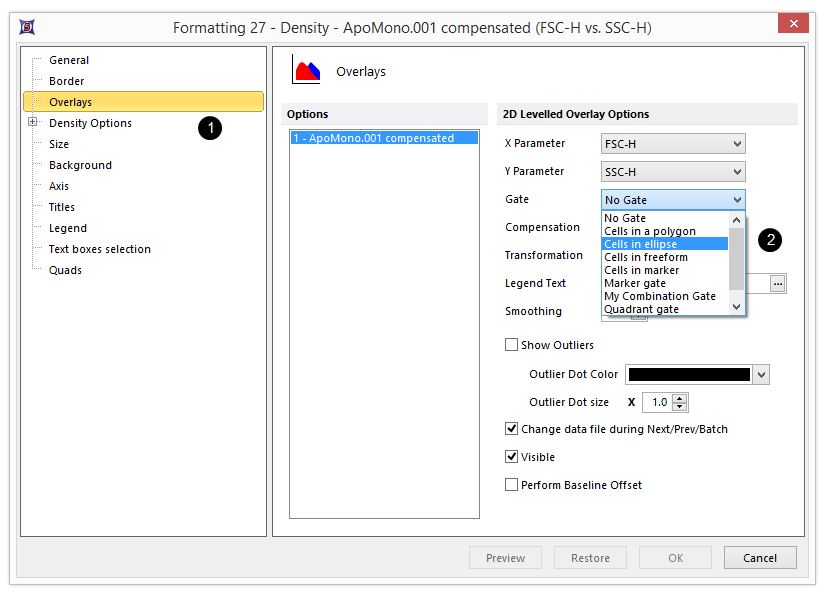
Figure T4.21 Formatting 2D Plots (Overlays Category)
| 5. | 点击OK按钮来接受所做的修改。 |
绘图现在看起来应该如图T4.22所示。
你的绘图可能不完全和图T4.22一模一样,因为你的椭圆形门的位置和实例中可能有所不同。
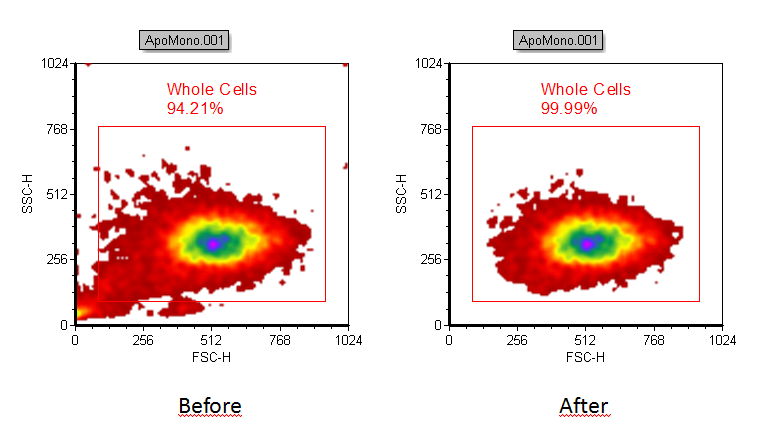
Figure T4.22 Plot Ungated (left) become gated on "Cells in Ellipse" (right)
| 6. | 请移动该椭圆形门。"Cells in ellipse(椭圆形中的细胞)"门移动时,应用该门的绘图会随着更新。 |
| 7. | 请点击刚刚应用了这个门的绘图,使其处于编辑模式。绘图处于编辑模式时,它的周围会有一圈绿色边框。 |
位于Gating(圈门)标签栏Create Gates(创建门)组的左边的Create Gates(当前门)处会显示"Cells in ellipse(椭圆形中的细胞)"(见图T4.23),表明当前的绘图圈中的是"Cells in ellipse(椭圆形中的细胞)"。
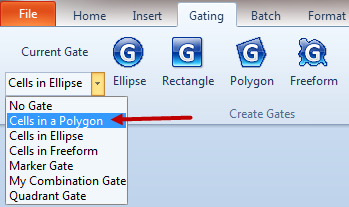
Figure T4.23 Selecting the "Cells in a Polygon" Gate
| 8. | 请点击"Cells in ellipse(椭圆形中的细胞)"旁边的箭头来下拉出可用的门。 |
| 9. | 请选中"Cells in a polygon(多边形中的细胞)"门(图T4.23)。 |
如图T4.24所示,现在绘图中应该只显示在"Cells in polygon(多边形)"门中的细胞。
注:您的绘图可能不完全和图T4.22一模一样,因为你的椭圆形门的位置和实例中可能有所不同。
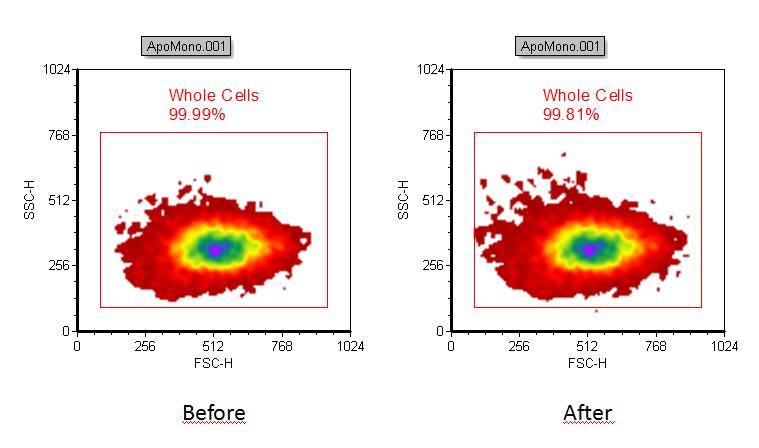
Figure T4.24 Plot Gated on "Cells in Ellipse" (left) become gated on "Cells in Polygon" (right)
| 10. | 选择View(视图)→Navigators(导航器)→Gate Navigator(门导航器)命令。 |
| 11. | 这时,Gate Navigator(门导航器)将出现(图T4.25)。此Gate Navigator(门导航器)上显示版面里当前存在的所有门,并表明某个绘图上应用的是哪个门。 |
| 12. | 移动Gate Navigator(门导航器)到版面的一侧,有助于您查看绘图的全貌。 |
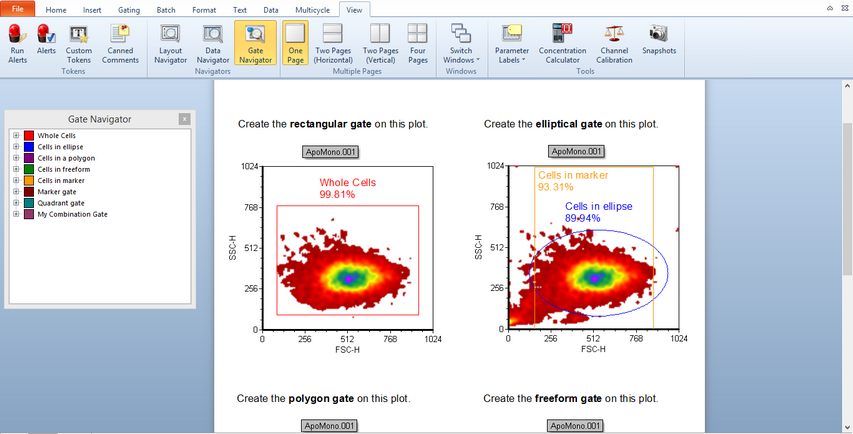
Figure T4.25 Opening the Gate Navigator window
| 13. | 按下鼠标左键不放,让其覆盖过位于Gate Navigator(门导航器)中的Cells in free form(在自由形中的细胞)。当Cells in freeform(在自由形中的细胞)门被选中时,它会被高亮显示(图T4.26)。 |
| 14. | 将“Cells in freeform(在自由形中的细胞)”门拖拽到标有"Create the rectangular gate on this plot(在此绘图上创建矩形门)"的二维绘图中。此时,鼠标将在该二维绘图上,此二维绘图将被蓝色高亮显示(图T4.26)。 |
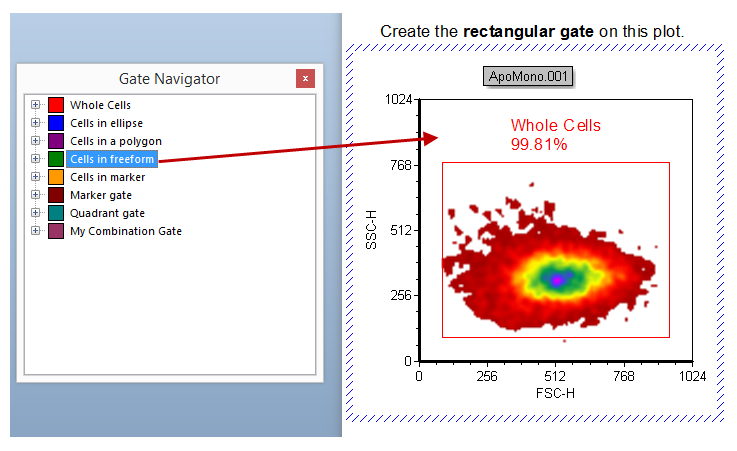
Figure T4.26 Drag&Drop a Gate from the Gate Navigator window onto a plot
| 15. | 松开鼠标左键,在绘图上应用该门。 |
如更新后的Gate Navigator(门导航器)显示的那样,"Cells in freeform(在自由形门中的细胞)"门现在应用到了该绘图上(图T4.27)。
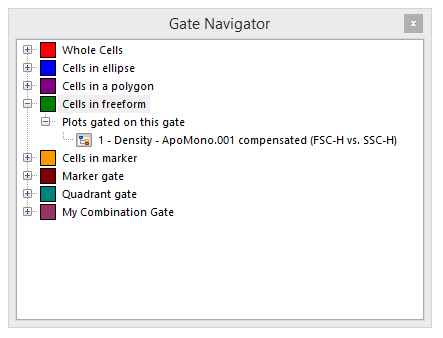
Figure T4.27 Gate Navigator Updated
注:用户也可从任何绘图上的Gate View(查看门)中拖拽一个门(图T4.13),方式与从Gate Navigator(门导航器)中拖拽的方式一样。
