导出单个的图片
在以下两节中,你将学习:
| • | 如何从一组不是从96孔细胞盘中获取的单个图片中,以数值的形式,导出CellProfiler数据。 |
| • | 如何把数据导入到FCS Express第5版中。 |
这一部分适用于单个图片数据组,这组图片不是从96孔细胞盘上采集的,而是从例如一个玻片上拍下来的。
在这一节中,我们要用到的向FCS Express中导入数据的CellProfiler模块包括: LoadImages(导入图片)模块、ConvertObjectsTo Images(把对象转化为图像模块)、SaveImages(保存图片)模块以及ExportToSpreadsheet(导出到电子表格)模块。本例中设置好的管道文件可以在Tutorial Sample Data archive(教程样本数据库)中找到,其名称是Section2pipelineCOMPLETED.cp。这个设置好的、作为模板的管道可以用来和用户的管道进行比较,且代表本教程的成品。
The sample images in the example data set we will be using can be found in theTutorial Sample Data archiveand are labeled "5 and 10 minute time point images"These images are based on the "Human cytoplasm-nucleus translocation assay (SBS Bioimage)"sample experiment found atCellProfiler Examples.

The steps for exporting data from CellProfiler have been broken down by module.After loading theSection2pipeline.cp, follow the steps below to amend the pipeline to prepare for export to FCS Express.
Selecting Default Input and Output Folders
To organize your data correctly for FCS Express, first ensure that the default input (where your images are stored) and output folders in CellProfiler are set to the same folder in the Input/Output Folder window (Figure T24.13).
Note:The DefaultOUT.mat file will also be exported to the Output Folder.This file is for use in MATLAB.If you do not wish to use this file, we recommend deleting it to conserve disk space.

Figure T24.13 Set the Default Input and Output Folders to the Same Location
LoadImages Module Setup
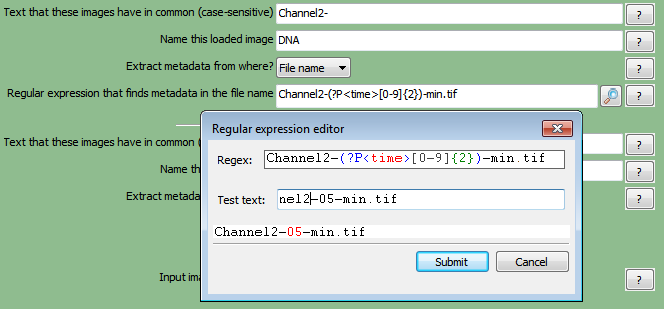
In order for FCS Express to recognize your data throughout the pipeline, metadata from the image file names must be extracted.A Regular Expression must be defined to find the metadata in the file name or path of the data by following these steps (Figure T24.14):
| 1. | Click on theChannel2-drop-down list labeledExtract metadata from where?. |
| 2. | Select which metadata you wish to use.For this example, chooseFile name. |
| 3. | Enter the "Regular Expression" you wish to use in the field labeledRegular expression that finds metadata in the file name.For this example we will use "Channel2-[0-9]{2}-(?P<Row>[A-H])-(?P<Column>[0-9]{2}).tif" which defines the plate location of the image by Row Letter and Column Number found in the image name. |
Notes:
| • | Follow these links for a tutorial on "Regular Expressions" and how totranslate regular expressions. |
| • | Setting up metadata and regular expressions only has to be done for one image in the set.For this example, it has been set up for channel 2. |
| • | The regular expression output names: Well, Row, Column, and Col may only be used with plate based or montage imaging experiments.Using any of these names for a single image experiment will result in a non-working export. |

Figure T24.14 Setting Up a Regular Expression in the LoadImages Module
ConvertObjectsToImage Modules
In this module, the objects you have defined through the "Identify Primary/Secondary Objects" module will be converted to image masks that FCS Express will use during import and analysis.See Figure T24.15 for an example of the module window.
| 4. | Select the firstConvertObjectsToImagemodule in the pipeline. |
| 5. | ChooseNucleifrom theSelect the input objectsdrop-down list. |
| 6. | Name the output imagewith any name you prefer.For this example, use "Nuclei". |
| 7. | Select the color typefrom the drop-down list and chooseuint16(Figure T24.15). |
| 8. | Select the secondConvertObjectsToImagemodule in the pipeline. |
| 9. | ChooseSelect the input objectasCellsfrom the drop-down list. |
| 10. | Name the output imagewith any name you prefer.For this example, use "Cells". |
| 11. | Select the color typefrom the drop-down list and chooseuint16. |
Note:Repeat steps 4-7 for as many objects you have defined through the Identify Primary/Secondary Objects module when defining your own pipeline.
(Note: In order for FCS Express to properly import the data theName the output imagename must be the same as theSelect the input objectsname and is case sensitive)

Figure T24.15 ConvertObjectsToImage Module: Defining Nuclei and Cells Image Masks
SaveImages Module
The image masks that were defined in theConvertObjectsToImagemodule must now be saved and related to the original images/data.
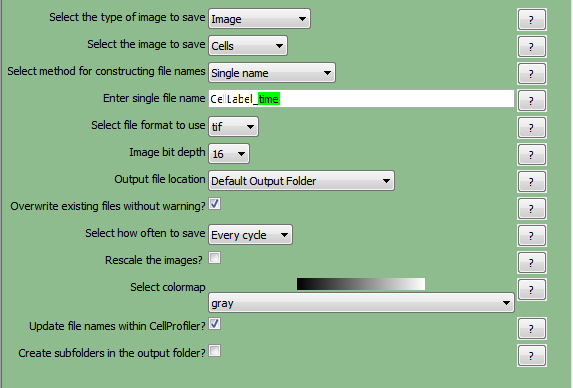
| 12. | Select the firstSaveImagesmodule in the pipeline. |
| 13. | Select the type of image to saveasImagefrom the drop-down list. |
| 14. | Select the image to saveasCells. |
Note:When defining your own pipeline, select the appropriate image you defined in theConvertObjectsToImagemodule.
| 15. | Select method for constructing file namesassingle namefrom the drop-down list. |
| 16. | Enter single file nameas any name you prefer followed by a hyphen"-"For this example useCellLabel-. |
| 17. | Right-click afterCellLabel-, choosetime. |
| 18. | Select the secondSaveImagesmodule in the pipeline. |
| 19. | Select the type of image to saveasImagefrom the drop-down list. |
| 20. | Select the image to saveasNuclei. |
| 21. | Select method for constructing file namesasSingle namefrom the drop-down list. |
| 22. | Enter single file nameas any name you prefer followed by a hyphen"-"In this example we have chosenNucleiLabel-. |
| 23. | Right-click afterNucleiLabel-, choosetime. |
Note: "time" value you defined as regular expressions for the load images module.Using regular expressions allows every output file to be assigned a unique file name based on the text from the input file name.This will prevent output file names from overwriting each other and allow FCS Express to identify the unique image mask associated with each image file.
Perform steps 24-30 on bothSaveImagesmodules set up forCellLabelandNucleiLabel.
| 24. | Select the format to useastiffrom the drop-down list. |
| 25. | SetImage bit depthat16from the drop-down list. |
| 26. | ChooseDefault Output FolderfromOutput file location. |
| 27. | Check theOverwrite existing files without warning?box. |
| 28. | SetSelect how often to saveasEvery cyclefrom the drop-down list. |
| 29. | Select colormapasgrayfrom the drop-down list. |
| 30. | Check theUpdate file names within CellProfiler?box. |
TheSaveImagesmodule forCellLabelshould now look like Figure T24.16a.
(Note: in CellProfiler Version 2 theUpdate names within CellProfiler?check box has been renamedStore file and path information to the saved image?Figure T24.4b)

Figure T24.16a Defining the SaveImages Module

Figure T24.16b Defining the SaveImages Module in CellProfiler V2
ExportToSpreadsheet Module
Now that all of the images and object image masks have been defined and saved for analysis, you must now ask CellProfiler to export the measurements you wish to view in FCS Express.For this example, we will export all measurements.
(Note: If you would like to only export certain parameters please see theSelecting Individual Parameters for CellProlifer Exportsection)
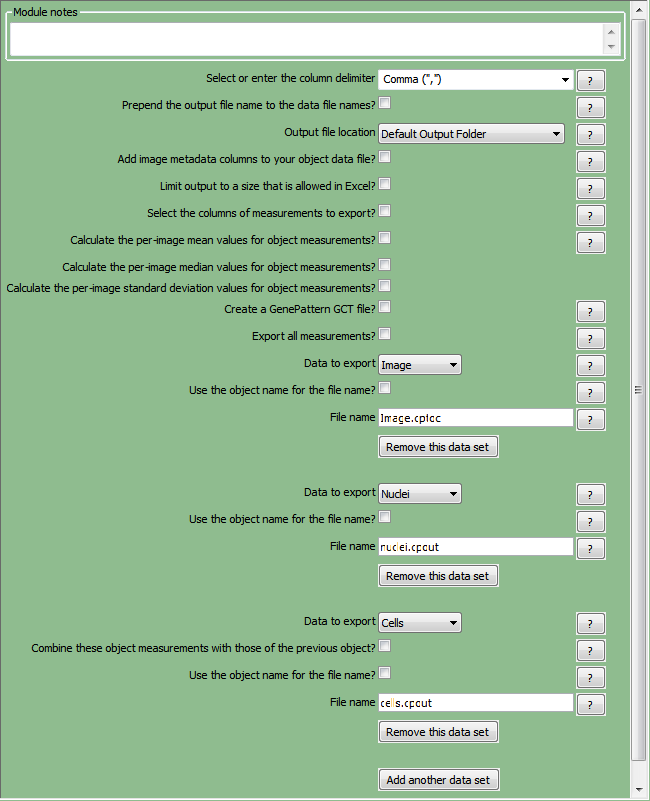
| 31. | Select theExportToSpreadsheetmodule. |
| 32. | Select or enter the column delimiterby choosingComma (",")from the drop-down list. |
| 33. | Uncheck thePrepend the output file name to the data file names?box. |
| 34. | ChooseOutput file locationasDefault Output Folderfrom the drop-down list. |
| 35. | UncheckExport all measurements?. |
| 36. | ChooseImagefrom the firstData to exportdrop-down list. |
| 37. | UncheckUse the object name for the file name?. |
| 38. | Set the file name asImage.cptoc. |
| 39. | ChooseAdd another data set. |
| 40. | ChooseNucleifrom the secondData to exportdrop-down list. |
| 41. | UncheckUse the object name for the file name. |
| 42. | Set the file name asnuclei.cpout. |
| 43. | Repeat steps 39-42 for"Cells"and set the file name ascells.cpout. |
TheExportToSpreadsheetmodule options should look like Figure T24.17 when you are done.
Note 1: on file extensions: ".cptoc" stands for CellProfiler Table of Contents and ".cpout" stands for CellProfiler Output.The "Image.cptoc" file stores information about the location and number of images for all objects processed in the pipeline, while the separate "Nuclei.cpout" and "Cells.cpout" store the actual listmode data associated with individual objects and analysis.There should be a separate ".cpout" file defined for each object mask defined in CellProfiler.Only one "Image.cptoc" file is needed.
Note 2:The name of your .cpout file must begin with the name of the object data you are exporting and may only be include the object name and regular expressions.For example: the file namesnuclei.cpoutandnuclei_<regular express>.cpoutwill result in a proper export whiledataset1nuclei.cpoutor<regularexpression>_nuclei.cpoutwill resulting in a non-working export.

Figure T24.17 ExportToSpreadsheet Module
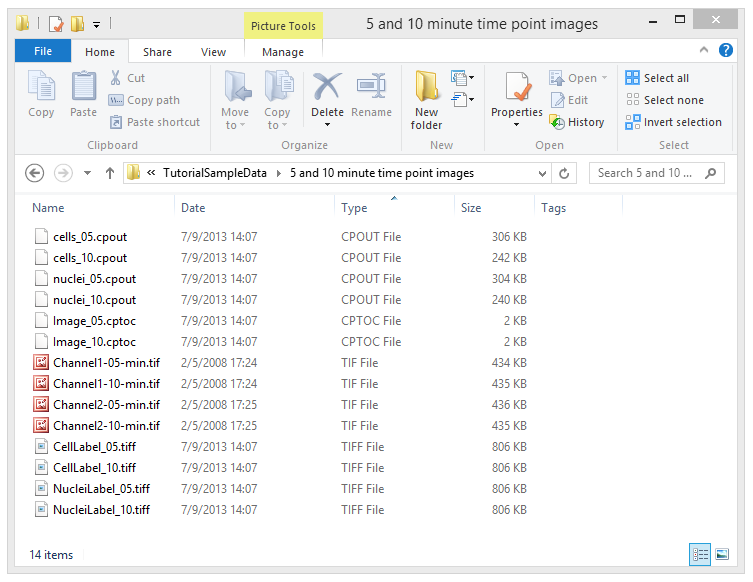
| 44. | Select Analyze imagesto run the pipeline.The folder where your images are stored will now contain the cells.cpout, nuclei.cpout and Image.cptoc files for each time point.There will also be a CellLabel and NucleiLabel image associated with every original image from the experiment (Figure T24.18). |

Figure T24.18 Example of Output Folder once CellProfiler Analysis is Complete
In the next section, we will import the single image experiment into FCS Express.
