Create Custom Tokens
In this section, we will:
| • | Create custom tokens. |
| • | Insert new columns into the Data Grid. |
| • | Insert custom tokens into the Data Grid. |
| • | Create token classifiers to use in the Data Grid. |
We now have all the essential data in our Data Grid; however, we still need to determine if the patient serum tested is a 'positive', 'negative', or 'weak' cross-match to the donor cells.
If you are starting the tutorial series from this step please open the HLA Custom Data_Completed.fey found in the FCS Express Sample Data folder. This layout has completed all of the previous steps in the tutorial.
To begin, we must first create custom tokens that normalize the 'sample' median fluorescence values based on a 'negative' value. We will use the median MESF FITC values from the B- and T-cells of the PBS NEGATIVE CONTROL as the 'negative' value and subtract this value from the median MESF FITC value of the samples. We will begin by inserting the Custom Tokens window.
| 1. | Select the View→Tokens→Custom Tokens command. |
The Custom Tokens window appears on the layout. We will now dock the window to the right side of the layout. For more information on docking, please see the Docking tutorial.
| 2. | Place the cursor over the top border of the Custom Tokens window. |
| 3. | Press and hold the left mouse button and drag the Custom Tokens window towards the right arrow of the four-headed Docking icon. |
| 4. | Release the button when the Custom Tokens window is over the right arrow of the four-headed Docking icon. |
The Custom Tokens window is now docked on the right side of the layout. Now, we will create the custom tokens that represent the MESF channel shift of the samples relative to the PBS NEGATIVE CONTROL sample. For more information on creating custom tokens, refer to the Custom Token Tutorial.
| 5. | Click on the |
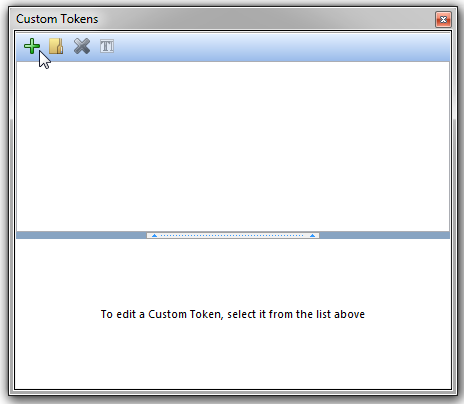
Figure T15.24 Creating a New Custom Token
| 6. | Type 'BShift PBS' for the Custom Token name. |
| 7. | Click in the bottom of the Custom Token window to start entering a formula. |
| 8. | Type '=' in the Custom Token definition area. |
We will now copy the appropriate median token value in the Data Grid into the custom token definition. Refer to Figure T15.25 for the following steps.
| 9. | Click inside the first cell in the 'Bcell Median' column of the Data Grid, indicated by the cursor and highlighted in grey. |
The Custom Data editor window appears on top with the statistic token definition in the editor window.
| 10. | Select the statistic token in the editor window. You will know it is selected because the text will be white. |
| 11. | Copy the text using Ctrl+C on the keyboard. |
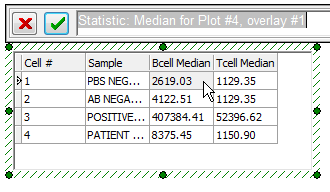
Figure T15.25 Copying the 'BCell Median' Token for the PBS NEGATIVE CONTROL Sample
Please refer to Figure T15.26 for the following steps.
| 12. | Select the 'BShift PBS' Custom token. |
| 13. | Click to the right of the '=' inside the Custom Token definition area. |
| 14. | Paste the 'Bcell Median' token definition using Ctrl+V on the keyboard. |
| 15. | Type '-' next to the 'Bcell Median' token definition. |
| 16. | Paste the 'Bcell Median' token definition using Ctrl+V on the keyboard. |
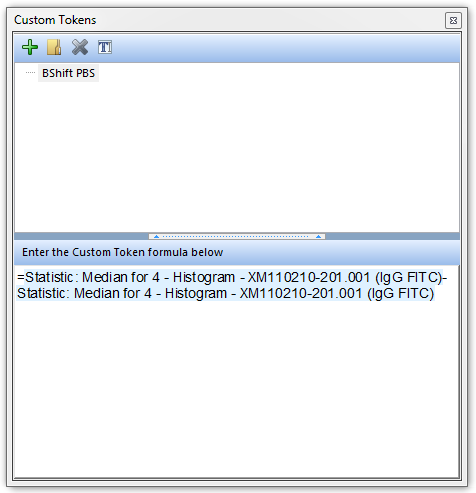
Figure T15.26 Creating the B-cell Median Shift Custom Token Definition
We have now created the Custom Token definition for the B-cell median MESF shift of the PBS NEGATIVE CONTROL sample, called 'BShift PBS'. By definition, this shift should equal zero. We will now create the Custom Token for B-cell median shift of the AB NEGATIVE HUMAN SERUM sample, calling it 'BShift NegSerum', by copying and pasting the definition of the 'BShift PBS' Custom Token. We will then drag and drop the 'Bcell Median' statistic token (of the AB NEGATIVE SERUM sample) from the Data Grid into the appropriate place in the Custom Token definition of 'BShift NegSerum'.
| 17. | If it is not already selected, then select the 'BShift PBS' Custom token. |
| 18. | Place the cursor to the left of the '=' in the Custom Token definition window. |
| 19. | Select the definition of the 'BShift PBS' Custom Token. You will know it is selected because the text will be white. |
| 20. | Copy the 'BShift PBS' Custom Token definition using Ctrl+C on the keyboard. |
| 21. | Left-click on the |
| 22. | Type 'BShift NegSerum' for the Custom Token name of the newly created custom token. |
| 23. | Click inside the Custom Token definition area. |
| 24. | Paste the 'Bcell Median' token definition using Ctrl+V on the keyboard. |
| 25. | Delete the text just after the '=' and before the '-'. |
| 26. | Select the cell in second row of the 'Bcell Median' column of the Data Grid, shown highlighted in Figure T15.27. |
| 27. | Select the statistic token in the editor window. You will know it is selected because the text will be white. |
| 28. | Press and hold the left mouse button and drag the token toward the Custom Token definition window. |
| 29. | Release the button when the token is after the '=' and before the '-' in the Custom Token definition window. |
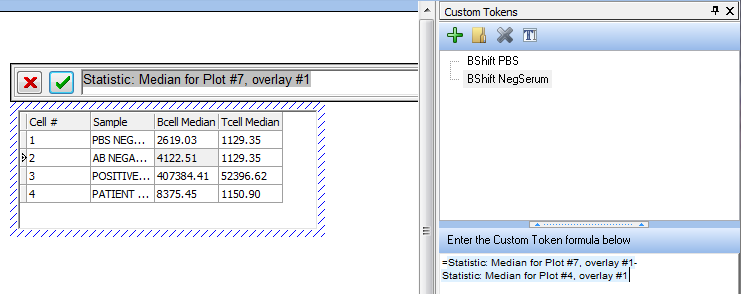
Figure T15.27 Dragging and Dropping the 'Bcell Median' Token for the AB NEGATIVE HUMAN SERUM Sample into the Custom Token Definition
The 'BShift NegSerum' Custom Token is now defined as the B-cell median of the AB NEGATIVE HUMAN SERUM – the B-cell median of the PBS NEGATIVE CONTROL, as shown in Figure T15.27.
To define the rest of the B shift Custom Tokens, repeat Steps 16 through 28 using the appropriate B-cell median tokens from the Data Grid for the POSITIVE HUMAN SERUM and PATIENT SERUM samples. Use the Custom Token names 'BShift PosSerum' and 'BShift Patient', respectively.
Again, repeat Steps 16 through 28 to define the T shift Custom Tokens using the appropriate T-cell median tokens from the Data Grid for all the samples. Remember to subtract the T-cell median of the PBS NEGATIVE CONTROL from all the samples and substitute 'T' for 'B' in the Custom Token names.
When you are done, the Custom Tokens window should look similar to Figure T15.28, which shows the definition for the 'TShift Patient' Custom Token.
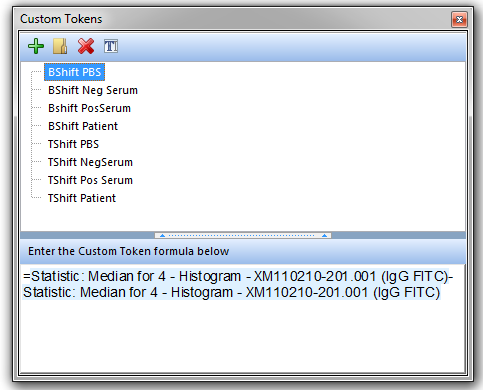
Figure T15.28 Custom Tokens Window
We will now add the B and T Shift Custom Tokens to the Data Grid, so we need to add two columns to the Data Grid. Refer to Figure T15.29 for the following steps.
| 30. | Right-click on the 'Tcell Median' column heading to bring up the pop-up menu. |
| 31. | Select Insert→Column to the Right from the pop-up menu. |
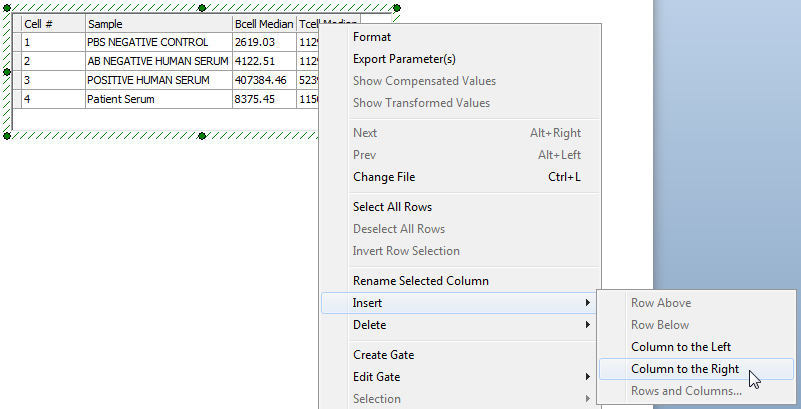
Figure T15.29 Inserting a New Column into the Data Grid
A New Column Name dialog appears, similar to previously shown Figure T15.8.
| 32. | Type 'BShift' in the New Column Name text field. |
| 33. | Click OK. |
A new column labeled 'BShift' appears on the Data Grid. Using steps 29 through 32, insert a new column labeled 'TShift' to the right of the newly created 'BShift' column. When you are done the Data Grid should appear similar to Figure T15.30.

Figure T15.30 Data Grid with New 'BShift' and 'TShift' Columns
We will now drag and drop the Custom Tokens into the cell of the new BShift and TShift columns. Please refer to Figure T15.31 for the following steps.
| 34. | Place the cursor over the 'BShift PBS' Custom Token, shown highlighted in blue. |
| 35. | Press and hold the left mouse button. |
| 36. | Drag the Custom Token toward the 'BShift' column of the Data Grid. |
| 37. | Release the button when the Custom Token is over the first cell of the 'BShift' column of the Data Grid, indicated by the cursor. |
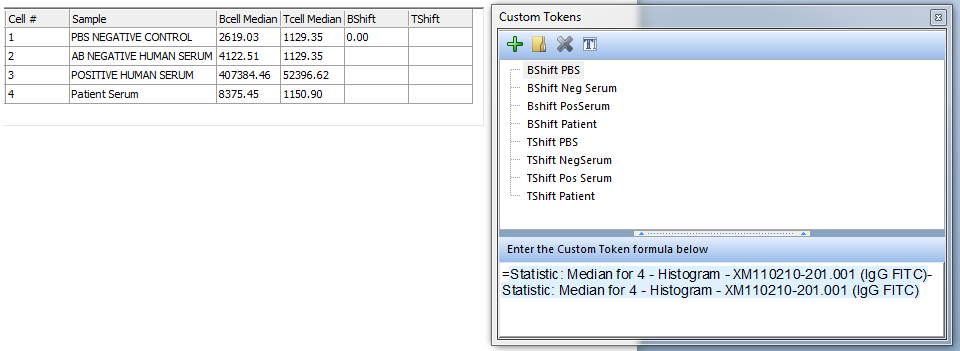
Figure T15.31 Dragging and Dropping the 'BShift PBS' Custom Token into the Data Grid
The Data Grid updates to reflect the insertion of the 'BShift PBS' Custom Token value, which is shown as '0.00' in Figure T15.31. This makes sense because the B-cell median MESF fluorescence value of the PBS NEGATIVE CONTROL sample is being used to define the negative. Continue to fill in the Data Grid by dragging and dropping each Custom Token into the appropriate cell of the BShift or TShift columns. When you are done, the Data Grid should look like Figure T15.32.

Figure T15.32 Data Grid with 'BShift' and 'TShift' Columns Completed
We can now close the docked Custom Tokens window.
| 38. | Select the 'X' in the upper right corner of the docked Custom Tokens window. |
Next, we will create and use token classifiers in the data grid.
