Creating Quadrant Gates and Compound Quadrant Gates
Creating Quadrant Gates
A set of Quadrant gates can be created on any 2D plot.
•Select the Gating tab→Create Gates→Quadrants command and click on the plot at the position where you want the central vertex to be located.
•If a new set of quadrants is added to a plot with existing quadrants, the new quadrants will be displayed on the plot while the former one will be hidden (but will not be deleted by the gate hierarchy).
Once you have finished creating the Quadrant, the Create New Quadrants dialog will appear (Figure 7.45). By default, only the Quadrants Information and the Quadrant Naming sections of the dialog will be expanded. Expanding the Quadrants Properties section will reveal additional options.
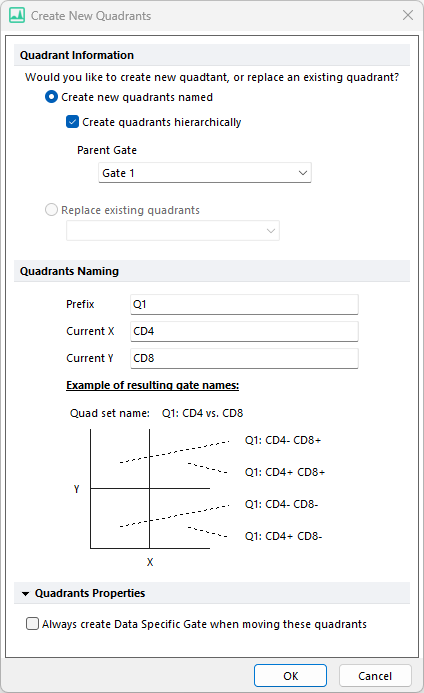
Figure 7.46 Create New Quadrant
The Create New Quadrant Dialog provides the following options:
Would you like to create new quadrants, or replace existing quadrants? |
Create new quadrants named This is the default selection.
When this option is selected, you can chose to Create Quadrants Hierarchically or not.
When Quadrants are created hierarchically, by default the new quadrant will be a child of the Overlay Gate of the base overlay on the plot. However, the Parent Gate option allows the user to modify this choice and thus make the new quadrant a child of a different gate.
When Quadrants are not created hierarchically, they will be placed outside of the hierarchy under "No Gate".
Note: The hierarchy of your gates can be adjusted at any time within the Gate View object as well.
When a new quadrant is created, the user has access to the Quadrants Naming Options (see below).
Replace existing quadrants
To replace an existing quadrant with the newly created quadrant, select the Replace existing quadrants radio button and choose the quadrant you wish to replace from the drop-down list. The new quadrant will replace the old quadrant without affecting your gating hierarchy (i.e. the parent gate of the drawn quadrant will be the same parent gate of the replaced quadrant).
|
Quadrants Naming Options |
In this section you may select the Prefix, Current X and Current Y for naming purposes. Below the naming choice an example (Example of resulting gate names:) is created to show you a preview of the resulting naming.
|
Always create a Data Specific Gate when moving these quadrants |
If checked, a data specific gate will always be created when moving the quadrant. |
Creating Compound Quadrant Gates
A Compound Quad Gate can be created for an existing set of quadrants.
In the Gate Navigator or Gate View, right-click on the set of quadrants, hover over Compound Quad Gates.
One of the following options may be selected, as displayed in Figure 7.46:
•Create Upper Gate (the resulting gate will include events from the upper quadrants; see red rectangle in the upper left pane in the picture below)
•Create Lower Gate (the resulting gate will include events from the lower quadrants; see red rectangle in the upper right pane in the picture below)
•Create Left Gate (the resulting gate will include events from the left quadrants; see red rectangle in the lower left pane in the picture below)
•Create Right Gate (the resulting gate will include events from the right quadrants; see red rectangle in the lower right pane in the picture below)
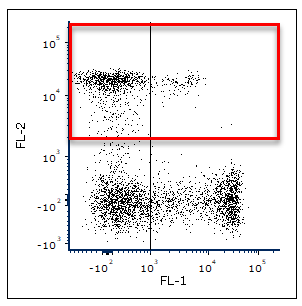 Upper Gate type of compound quad gate
|
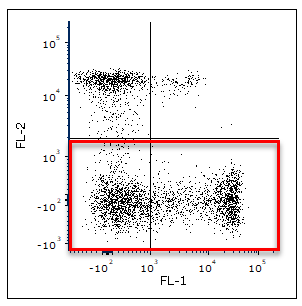 Lower Gate type of compound quad gate |
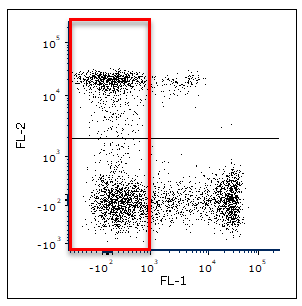 Left Gate type of compound quad gate
|
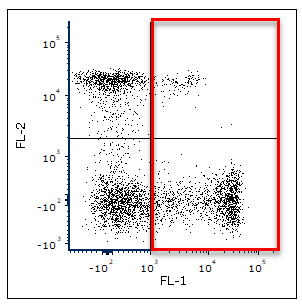 Right Gate type of compound quad gate |
Figure 7.47 Examples of Compound Quad Gates
