Using Batch Analysis

Contents
In this tutorial, we will cover how to setup a batch process to analyze data from multiple plates. The batch functions for plate heat maps are the same as for any other plot in FCS Express. For a more detailed introduction to batch processing, we recommend viewing the Batch Processing tutorial before you begin.
We will use the HighContentBatch.fey layout, along with the HighContent96wellData.dns and HighContentNewPlate.dns data files. The .dns is an extension created in FCS Express that allows for special compression of the data.
1. Open the HighContentBatch.fey layout located in the Tutorial Sample Data directory.
The layout is saved as unlinked and we must load our plate data into the Data List before we can begin adding batch actions.
2. Select the Data tab→Organize Data Sets group→Data List command.
3. Click the ![]() symbol to add data files to the data list. The Select data file window appears.
symbol to add data files to the data list. The Select data file window appears.
4. Choose DNS data Stream files (*.dns) from the Files of type: drop-down list (Figure T20.42, red outline).
5. Multiple-select the files HighContent96wellData.dns and HighContentNewPlate.dns (Figure T20.42).
6. Click Open file (Figure T20.42).
Note: you can select multiple files by keying down the Cmd on the keyboard while clicking files.

Figure T20.42 Multiple File Selection in Select Data File Window
7. Choose the Data tab→Change Data on All group→Select down arrow→Select using Advanced Open Data Dialog command (Figure T20.43). The Change Data File window appears (Figure T20.43).
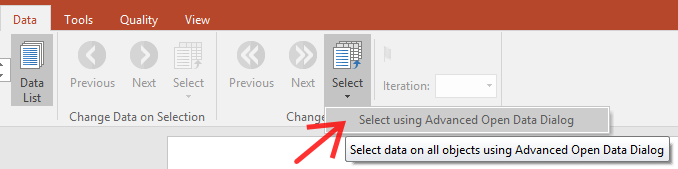
8.In the Change Data File window, click the Data List tab (Figure T20.43, ![]() ).
).
9. Choose HighContent96wellData.dns and click OK (Figure T20.43, ![]() ).
).

Figure T20.43 Selecting .dns File in the Advanced Open Data Dialog
Note: Alternatively to step 7-8-9, you make click the first data file HighContent96wellData.dns in the Data List and choose Change data on all plots from the Change data (fifth icon in Data List).
The layout will resemble Figure T20.44. There are three differently styled views of the plate heat map data and a table containing the statistics for each well in the plate heat map. We will define batch actions to export for the two plate files in the data list.

Figure T20.44 High Content Batch Layout with Data Loaded
10.Choose the Batch tab→Batch Processing group→Actions and reports command  . The Batch Actions window appears.
11. Choose Save to PDF, the fourth option from the Add Action category.
The Create Export to PDF Action window appears (Figure T20.45).
12. Click folder icon ![]() to define a file name and location for saving the PDF to right of the Save to a new file field for Output File Options(Figure T20.45,
to define a file name and location for saving the PDF to right of the Save to a new file field for Output File Options(Figure T20.45, ![]() ).
).
13. Click directly after the file name and before the extension ".pdf" to place cursor (Figure T20.45, ![]() ).
).
14. Click on the ![]() symbol to insert a token (Figure T20.45,
symbol to insert a token (Figure T20.45, ![]() ).
).
15. Open arrow to left of Batch Processing folder to open it (Figure T20.45, ![]() )
)
16. Double-click Current batch iteration in the Insert a Token dialog (Figure T20.45, ![]() ).
).

Figure T20.45 Saving PDF Action with Token Inserted into File Name
The Create Export To PDF Action dialog should resemble Figure T20.46.

Figure T20.46 Create Export To PDF Action Dialog after Adding Current Batch Iteration Token to File Name
17. Click OK.
18. Choose Save to PowerPoint from the Add Action drop-down menu in the Batch Actions window (Figure T9.7, ![]() ).
).
The Create Export to PowerPoint Action window appears (Figure T9.8).
19. Click folder icon ![]() to define a file name and location for saving the PowerPoint to right of the Save to a new file field for Output File Options(similar to Figure T20.45,
to define a file name and location for saving the PowerPoint to right of the Save to a new file field for Output File Options(similar to Figure T20.45, ![]() ).
).
The Create Export To PowerPoint Action dialog should resemble Figure T20.47.

Figure T20.47 Create Export To Powerpoint Action Dialog
20. Click OK.
The Batch Actions window now contains two actions: the Export to PDF and the Export to PowerPoint.
21. Choose the Batch tab→Batch Processing group→Run command ![]() .
.
22. Choose Yes in warning dialog about overwriting Iteration Snapshots to continue.
The batch process will iterate through each data file in the Data List and export the actions we have added to the directory you selected. Since there are only two files in the data list, there should be:
- Two PDF files containing one iteration each (since we choose to Save the output of each iteration separately). File names contain a common part ("BatchProcessExperiment") and a variable part (the token referring to the iteration number). The latter allow you to distinguish among the different PDF files generated by the batch process.
- One PowerPoint file containing all the iterations; since file name is unique and contains all the data files, the PowerPoint does not need any tokens.
In the last exercise, we will use the Z-Prime function.