Defining a PCA Transformation
Principal Component Analysis is performed in FCS Express through the Transformation window.
The steps below outline the process of creating a new PCA transformation on your data:
1. Open the Transformation window by selecting the Tools tab → Transformations → Transformations command. The Transformations window will open (Figure 9.90).
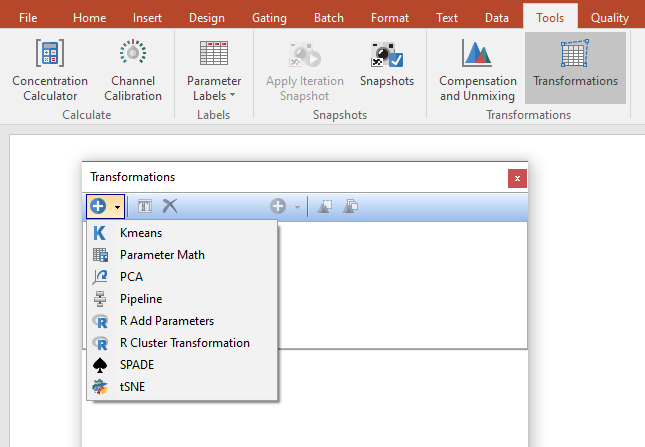
2. Click on the dropdown arrow adjacent to the blue plus ![]() button (Figure below).
button (Figure below).
3. Click on PCA in the dropdown list (Figure below).

Figure 9.89 Initial steps to create a new PCA transformation.
The PCA dialog will now appear in the Transformation window as seen in Figure 9.91.

Figure 9.90 The PCA dialog in the Transformations window
The new PCA transformation is named as New PCA by default but it can be easily renamed by either of the following methods:
•Right click on the PCA transformation that needs to be renamed→Select Rename.
•Select the PCA transformation that need to be renamed via left click and press F2 on your keyboard.
•Select the PCA transformation that need to be renamed via left click and click on the ![]() button in the Transformations tool bar.
button in the Transformations tool bar.
4.Choose a Template File for the PCA transformation by clicking on the ellipsis to the right of the Template File text box (Figure 9.92).
The PCA dialog will be populated with a list of available parameters to perform a PCA transformation based on available parameters from the template file (Figure below).

Figure 9.91 A template file has been chosen which subsequently populates the list of possible parameters to perform a PCA transformation.
5.Choose the parameters to define the transformation by checking the boxes next to the parameter names (Figure 9.93, Step 1). Parameters can be filtered or sorted to assist in the selection of parameters when multiple parameters are available in the template file. By right clicking in the parameters section, you can use Sort Ascending, Sort Descending, or Unsorted to easily manage parameter ordering and facilitate parameter selection. In the right click menu, you can easily select parameters by utilizing Check All, Uncheck All, Check Selected, Uncheck Selected, Invert Selection on All. The options Check Selected and Uncheck Selected allow for using the shift key or Ctrl key to multi-select parameters and check or uncheck them all simultaneously.
6.Choose or change to the appropriate Parameter Scaling Options for each of the selected parameters if required (Figure below, Step 2). By using the Apply scaling to button All or Checked the user can define the parameters to be scaled.

Figure 9.92 Parameters for the PCA transformation are selected by checking the boxes next to the parameter names.
The PCA transformation has now been defined and automatically calculated by default. The PCA transformation can now be applied to any plot in FCS Express (see, Applying a PCA Transformation).
Note the following options:
•A gate may be selected to only evaluate the matrix for events falling within the gate from Gate dropdown menu.
• Sampling Options (optional). Although multiple Sampling Methods are available (please refer to the Sampling Options chapter for more details), the default Downsampling Algorithm for PCA is None, thus all available events (i.e. the ones defined with the Gate drop-down menu) will be used.
•Transformed Data Options (optional). Allows you to customize the Display Name Suffix for the PCA transformation by entering information into the adjacent text box. This modifies what is displayed on a plot when the transformation is applied.
•The Parameters to keep option allows you to define how many principal components are defined for the data set (the figure below depicts an example in which 3 parameters have been kept).
•The Output Style choices are:
oAppend to initial data adds the newly created principal component (PC) parameters to the end of the parameter list in the data file when the PCA is applied (Figure 9.94, left).
oPCA only only displays the PC parameters on a plot when the PCA is applied (Figure below and right).

Figure 9.93 PCA transformation Output Styles
To defer calculating the PCA matrix, uncheck the box for Automatically Calculate PCA Matrix. Doing so will present you with the button to Calculate the PCA Matrix (Figure 9.95).

Figure 9.94 Unchecking the Automatically Calculate PCA Matrix box will defer calculating the PCA matrix.
After pressing the button to Calculate the PCA Matrix the matrix will be displayed in the bottom pane of the window (Figure 9.96)

Figure 9.95 Once the Calculate PCA Matrix button is pressed the matrix will be calculated and shown in the dialog.
