Creating an Internet Dongle or Site License User
Before proceeding with the instructions below, please note that each user must first create a free account on the De Novo Software website with their email address (https://denovosoftware.com/register/).
To create a new user:
1. Use the File tab→Security→User Administration command.
2. Click on the Add button in the User Administration dialog.
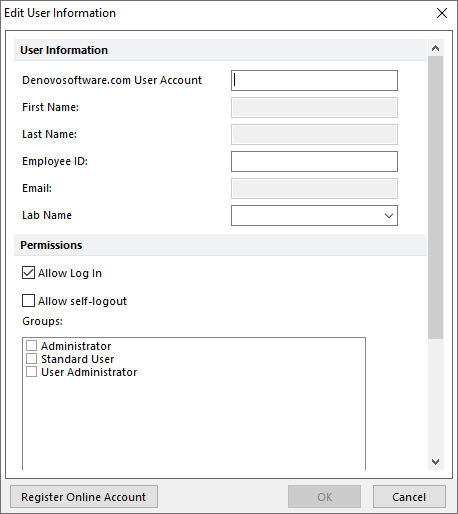
The Edit User Information dialog will appear (Figure 18.36).

Figure 18.36 Edit User Information Dialog
The Denovosoftware.com User Account field must be an email address associated with a valid account at https://www.denovosoftware.com. The First Name, Last Name, and Email fields will be populated based on the information provided for the De Novo Software website account. The Employee ID and Lab Name fields are optional. Previously added Lab Names will be available in the Lab Name drop down menu. The Lab Name is used to organize users in the Billing Report.
The Allow Log In checkbox determines whether that user can log in. The Allow self-logout checkbox determines if a user can log themselves out remotely.
At least one option must be selected in the Groups box for the user. Internet Dongle and Site License customers have the ability to assign the user to one of the following pre-defined user groups:
oAdministrator: User assigned to this group will be able to use the software to analyze data, to add, edit and delete users, to view Security Reports and to edit the Security Configuration.
oStandard user:User assigned to this group will only be able to analyze data.
oUser Administrator: User assigned to this group will only be able to add, edit and delete users, to view Security Reports and to edit the Security Configuration.
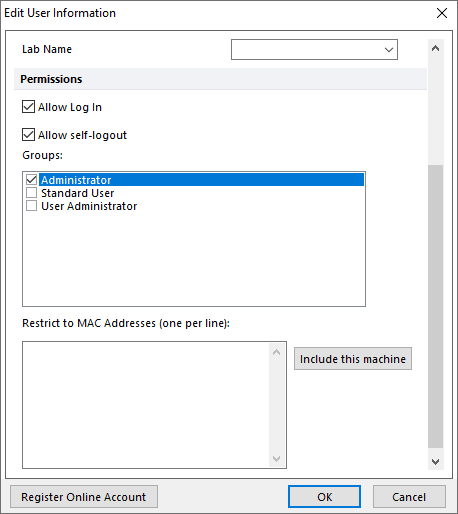
The user may be restricted to defined MAC address(es) as well. Clicking Include this machine button will populate the Restrict to MAC Addresses (one per line): box with the MAC address from the computer used to create the user (Figure 18.37).
The Register Online Account button will direct the person to https://www.denovosoftware.com/register/ to create a new user account, which will be associated with the license.

Figure 18.37 Restrict User to Defined MAC Address(es) in User Information Dialog
Multiple users can be automatically added to the database via the Add from CSV button (see User Administration dialog, first figure above). The CSV file can be either a comma-delimited or a semicolon-delimited file and must contain the following columns:
Column Header |
Specific requirements |
Example |
LoginName |
Must be email of valid account registered at https://www.denovosoftware.com/register/ |
John.Smith@DNS.com |
Password |
Must use "denovosoftware.com user" |
FlowTest123 |
FirstName |
Must match first name used for valid account registered at https://www.denovosoftware.com/register/ |
John |
LastName |
Must match last name used for valid account registered at https://www.denovosoftware.com/register/ |
Smith |
EmployeeID |
None |
123456 |
Must match email used for valid account registered at https://www.denovosoftware.com/register/ |
John.Smith@DNS.com |
|
LabName |
None |
Flow Lab |
CanLogin |
Enter: T or F or True or False |
True |
CanLogMyselfOut |
Enter: T or F or True or False |
F |
ForcePasswordExpired |
Enter: T or F or True or False |
T |
SecurityGroups |
For internet dongle user types: Administrator, Standard User or User Administrator (see above for additional details). User group names can be inserted as comma-delimited list. For comma-delimited CSV files, said list has to be surrounded by quotes. If a group name include comma in it, that name has to be included in double quotes for both comma-delimited and semicolon-delimited CSV files.
Note: If MS Excel is used to edit the CSV files, user group names can be simply listed as comma-delimited list with a single quote character around any group names that have commas in them. |
Standard User
or
Comma delimited: "Group 1, Group 2, Group 3" or "Group 1, ""Group,2"", Group 3"
Semicolon-delimited CSV file: Group 1, Group 2, Group 3 or Group 1, ""Group, 2"", Group 3
|
RestrictToMACAddresses |
N/A |
N/A |
Example of .CSV import in Excel below. A template for the CSV file import may be downloaded for use here.

