Formatting the Gate View
The Gate View has formatting properties that can be accessed by either:
oright-clicking on the Gate View, selecting Format from the pop-up menu, and choosing a category from the drop-down; or
oselecting the Gate View and choosing the desired category from the Format tab of the Ribbon.
The Gate View shares a number of formatting options with all other objects:
oFill
oSize
In addition, there are two specific options that are available to format in the Gate View:
oGate View Options
oGates to Display
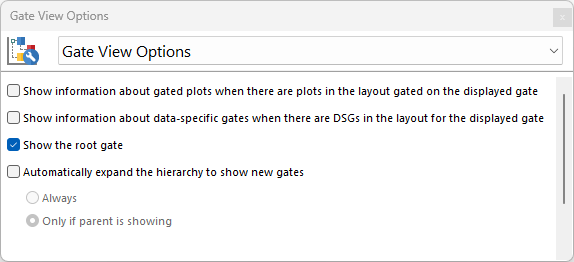
Gate View Options: (Figure 5.172)
The Gate View Options allow users to choose what information to display in the Gate View.
▪Show information about gated plots when there are plots in the layout gated on the displayed gate. Check this option to display the specific plots on which gates have been applied.
▪Show information about data-specific gates when there are DSGs in the layout for the displayed gate. Check this option to display any Data Specific Gates which have been created.
▪Show the root gate. Check this option to show the "No Gate" root gate in the hierarchy.
▪Automatically expand the hierarchy to show new gates. This option allows the user to automatically expand the hierarchy to display new gates. The automatic expansion can happen for all new gates or only when the parent of the new gate is already visible.

Figure 5.171 Top - Gate View Options found in the Formatting Tab Dropdown. Bottom - A Gate View showing plot navigator items and data specific gates.
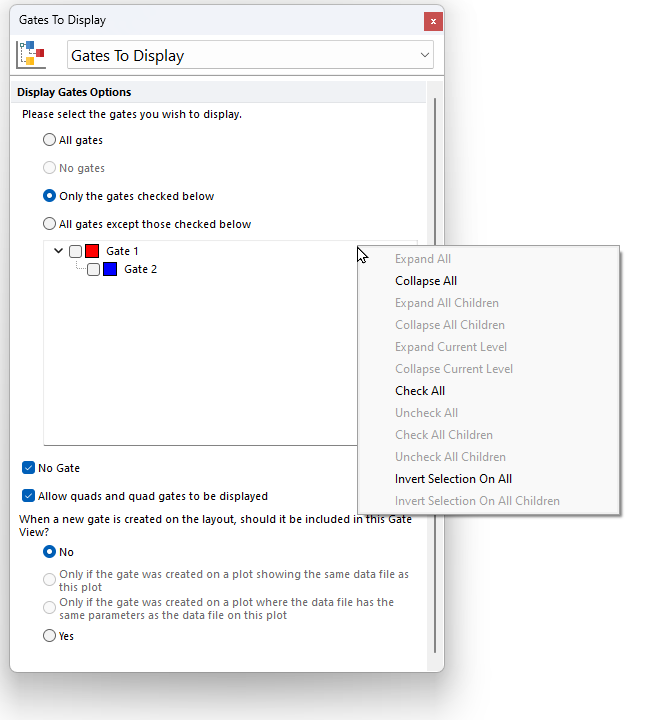
Gates to Display: (Figure 5.173)
The Gates to Display formatting options in the Gate View allows users to choose which gates to show within the Gate View.
By default, the All Gates option is selected. However, you can select Only the gates checked below and then select the gates you wish to display. Alternatively, select All gates except those checked below and then choose the gates you do not wish to display.
A right-click menu is available within the Gate to Display dialog as displayed in Figure 5.174 below. The right click menu allows users to:
▪Expand/collapse All gates
▪Expand/Collapse All Children gates within the selected gate
▪Expand/Collapse Current Level (this expand only the first level of children gates within the selected gate)
▪Check/Uncheck All gates
▪Check/Uncheck All Children gates within the selected gate
▪Invert Selection on All gates
▪Invert Selection on All Children gates within the selected gate
When the option Only the gates checked below is checked, the No option will be the default selection for When a new gate is created on the layout, should it be included in this Gate View? However, you can change this setting if preferred.
No Gate. Check or uncheck this option to show or hide the No Gate root gate in the Gate Navigator
Allow quads and quad gates to be displayed. Check or uncheck this option to show or hide quadrants and quadrant gates in the Gate View.

Figure 5.172 Gates to Display Options in the Gate View Formating dropdown.
