Gate Navigator
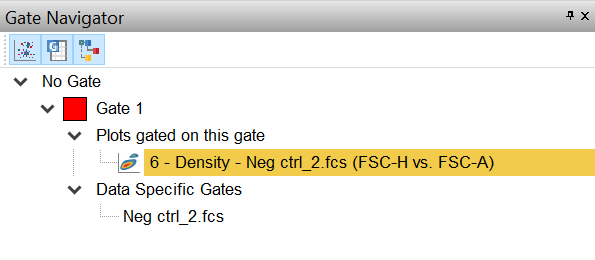
The Gate Navigator (Figure 4.31) shows a hierarchical view of the gates that have been defined in your layout. The Gate Navigator opens by default pinned on the bottom left side of the screen when new layouts are created. The default setting for viewing and pinning the Gate Navigator can be modified in the Gates category of the User Options.
Using the Gate Navigator it is possible to achieve many of the same actions as you can with the Gate View such as:
•edit gate properties (gate name, gate color, emphasis,...)
•change hierarchies by using drag&drop
•apply gates to plots in the layout via drag&drop
•right-click menu options (Format, Add Combination Gates, Exporting to GatingML, Link Gates, Expand/Collapse the hierarchy,Copy/Cut/Paste...)
For more details on how to perform the actions above, please refer to the Gate View chapter.
Note: The Gate View is an insertable object that can be inserted into the layout for printing or reporting. The Gate Navigator is a separate dockable window instead.

Figure 4.31 Gate Navigator
There are three buttons along the top of the Gate Navigator which allow you to customize the information displayed:
•![]() Hide/Show the plots gated on each gate allows the information on plots gated on each gate to be hidden/viewed.
Hide/Show the plots gated on each gate allows the information on plots gated on each gate to be hidden/viewed.
It is also possible to change plot names in this area. For plots, the name property is the name of the plot to display in lists (Format→General options). This is used wherever the user is required to select a plot or whenever displaying objects in different Navigators.
For convenience, hovering the mouse cursor over a plot in the docked Gate Navigator window, displays a thumbnail view of the plot.
•![]() Hide/Show Information about data-specific gates allows information on data-specific gates and data-specific gate groups, if present, to be hidden/viewed.
Hide/Show Information about data-specific gates allows information on data-specific gates and data-specific gate groups, if present, to be hidden/viewed.
For more details, please refer to the Data Specific Gates and Data Specific Gate Groups chapters.
•![]() Hide/Show the root gate allows the root gate (named by default "No Gate", but editable) to be hidden/viewed.
Hide/Show the root gate allows the root gate (named by default "No Gate", but editable) to be hidden/viewed.
When a new layout is created, the option is defaulted to display the root gate but the setting can be modified in the Gates category of the User Options along with additional related options.
Drag and drop capability with the Gate Navigator
Click on a node to select it. While holding the mouse button down, drag the node to your layout and release the mouse button. The results of drag and drop operations are described in the table below.
Drag and Drop Operation |
Function |
|---|---|
Drag a gate to a plot in the layout (or to a plot within the Gate Navigator). |
Applies the gate to the plot. |
Drag (or Copy & Paste, or Cut & Paste) a plot (in the layout or within the Gate navigator) onto a gate of the Gate Navigator. |
The target gate will be made Data Specific for the dragged data. If Cut is used, the cut plot will be removed. |
Drag (or Copy & Paste, or Cut & Paste) a plot to an empty part of the layout. |
A copy of the plot will be created in the new location. If Cut is used, the cut plot is removed. |
Drag a plot onto a plot in the layout (or to a plot within the Gate Navigator) |
Adds the appropriate data to the existing object. If the target plot supports overlays, the action brings up a Paste Special dialog to insert data or overlays. If the target plot does not support overlays, the data loaded in the dragged plot is loaded in the target plot. |
Copy and Paste (or Cut and Paste) a plot from the Gate Navigator onto a plot in Edit mode within the layout |
Adds data to the plot. If the target plot supports overlays, the action brings up a Paste Special dialog to insert data or overlays. If the target plot does not support overlays, the data loaded in the dragged plot will be loaded in the target plot. When Cut is used, the cut plot is removed from the Data Navigator. |
Drag and drop a gate to a different position within the Gate Navigator |
The gate is moved into the new position in the hierarchy. |
Gate Navigator Formatting Options
The Gate navigator window can be formatted in order to display or not display plots on which those gates have been applied as well as data files the Data Specific Gates are applied to.
To format the Gate Navigator:
1. Right-click on any empty part of the Gate Navigator window.
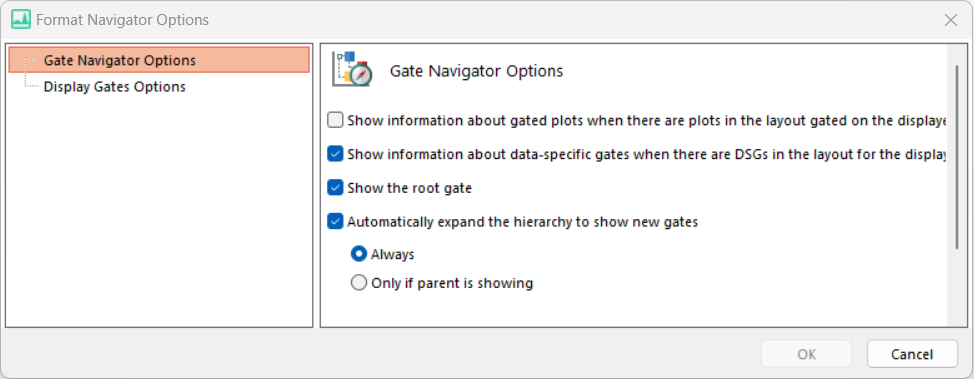
2. Select Format from the right-click menu. A Format Navigator Options window with the following options will open (Figure 4.32):
▪Show gated plots. Check the option to display the specific plots on which gates have been applied.
▪Show data specific gates. Check the option to display any Data Specific Gates which have been created.
▪Show all cells root gate in the gates hierarchy. Check the option to show the No Gate root gate in the hierarchy.
▪Automatically expand the hierarchy to show new gates. This option allows the user to automatically expand the hierarchy to display new gates. The automatic expansion can happen for all new gates or only when the parent of the new gate is already visible.

Figure 4.32 Gate Navigator Options
Display Gates Options
The Gates to Display formatting options in the Gate Navigator allows users to choose which gates to show within the Gate Navigator.
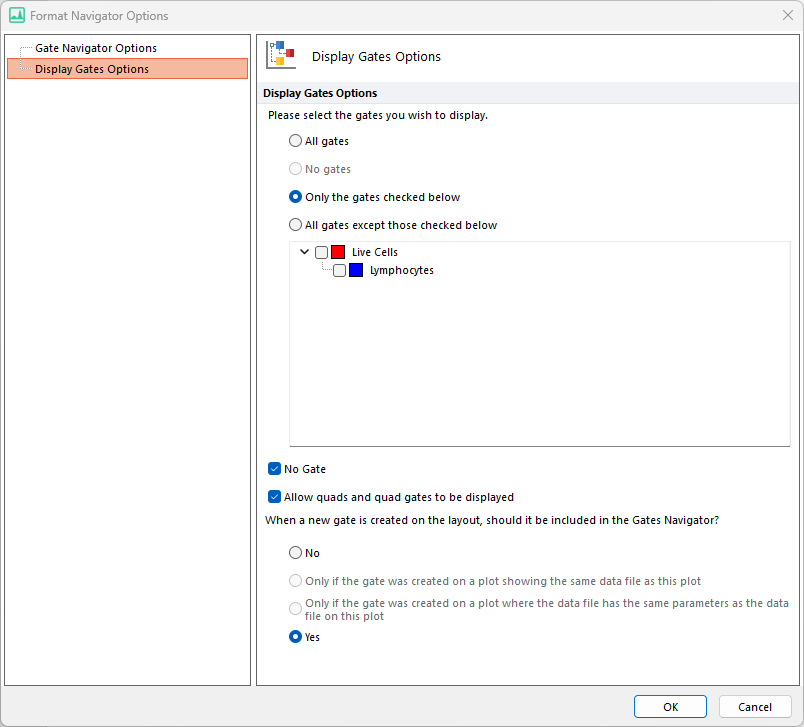
By default, the All Gates option is selected. However, you can select Only the gates checked below and then select the gates you wish to display. Alternatively, select All gates except those checked below and then choose the gates you do not wish to display.
A right-click menu is available within the Gate to Display dialog as displayed in Figure 4.33 below. The right click menu allows users to:
▪Expand/collapse All gates
▪Expand/Collapse All Children gates within the selected gate
▪Expand/Collapse Current Level (this expand only the first level of children gates within the selected gate)
▪Check/Uncheck All gates
▪Check/Uncheck All Children gates within the selected gate
▪Invert Selection on All gates
▪Invert Selection on All Children gates within the selected gate
No Gate. Check or uncheck this option to show or hide the No Gate root gate in the Gate Navigator
Allow quads and quad gates to be displayed. Check or uncheck this option to show or hide quadrants and quadrant gates in the Gate Navigator.
When the option Only the gates checked below is checked, the Yes option will be the default selection for When a new gate is created on the layout, should it be included in this Gate View? However, you can change this setting if preferred.

Figure 4.33 Display Gates Option in the Gate Navigator
