Creating Custom Tokens
To create a Custom Token:
1. Click on the View tab→Tokens→Custom Tokens command to bring up the dockable Custom Tokens window.
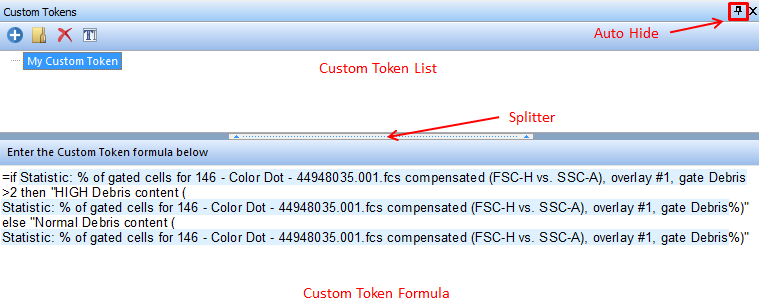
2. As with many of the functional windows in FCS Express, the Custom Tokens window can be docked to the sides of the screen. This helps keep the window within reach, while not getting in the way. Once docked, the window can be pinned to enable the Auto Hide feature.
3.The two areas of the Custom Tokens window, the Custom Token List (upper pane) and the Custom Token Formula Editor (lower pane), are separated by a splitter which can be moved to re-size the areas. (Figure 12.52)

Figure 12.52 Docked Custom Tokens Window
3. Click on the ![]() (Add) icon.
(Add) icon.
4. Give the New Custom Token a unique name.
5. Click on the Token name in the list so that it is highlighted.
6. Enter or edit the formula:
•Right-click in the lower pane of the Custom Tokens window, select Insert Token from the pop-up menu, and choose a token from the Insert a Token dialog; alternatively, drag and drop a gate or plot from your layout which serves as Data Source into the lower pane of the Custom Tokens window to access the Edit Statistic dialog.
•Modify the formula. You can use any of the operators and functions that are available for custom tokens.
The icon buttons in the Custom Tokens window are explained in the table below.
Icon Button |
Explanation |
|---|---|
|
Add a new Custom Token. |
|
Create (and name) a new folder to manage Custom Tokens. Drag & Drop Custom Tokens into the folder once it has been created. |
|
Delete the selected item. Note: You can undo a delete by immediately clicking Undo in the Quick Access Toolbar. |
|
Rename the currently selected item. |
To understand how Custom Token formulas operate, and how to use them, a number of examples are shown in the next sections of this chapter.
