Exporting to LabKey Server
LabKey Software and De Novo Software have worked together to provide direct export capabilities from FCS Express Flow Cytometry to LabKey Server. The collaboration will allow high volume flow cytometry users a unique combination of report generation and analysis with FCS Express and an online data environment, extra quality controls, and workflow tools from LabKey Server. Various items including tokens, pictures, files, and even your entire FCS Express analysis can be exported to LabKey Server, simply by adding a LabKey Report as a Batch Process Action.
In this exercise, we will:
•Download the free LabKey Server to your local computer.
•Create a LabKey Server Report with FCS Express Batch Actions.
•Add the following items to the LabKey Server Report Batch Actions:
oFCS Express Layout (.FEY) file
o.FCS files
oPicture of a 2D plot (JPEG format)
To export to LabKey Server:
The first step in exporting to LabKey Server is to register and install LabKey Server to your local machine. If you have already completed this step, please proceed to step 2.
1.Download LabKey Server to your local computer and register with LabKey Server by signing up here. Alternatively, write to us at support@denovosoftware.com if you would like to try out this tutorial using De Novo Software's own LabKey server for public use.
2.Set up an Assay Design in LabKey Server to which you will export FCS Express data, by following the directions in the LabKey Setup: Folder and Assay Design/Protocol section of the accompanying LabKey tutorial.
Now, the LabKey Server is ready to receive your data from FCS Express; you may proceed to step 3 below to complete the rest of the tutorial in FCS Express.
3.Click the File tab→Open.
4.Open the layout LabKeyServerExportTutorial.fey found in the "LabKey Server Export" folder within the Tutorial Sample Data archive.
The layout is currently displaying 2D density and dot plots and a histogram of the file Sample 1.fcs (Figure T10.47). The layout contains a data list with a total of 7 .fcs files which are also located in the "LabKey Server Export" folder to be used in the batch export process. The table in the upper right displays Participant ID and Date Keyword Tokens from the sample .fcs in the plots, the number of events in Gate 1 from the 2D density plot, and the percent of gated events in M1 from the histogram.
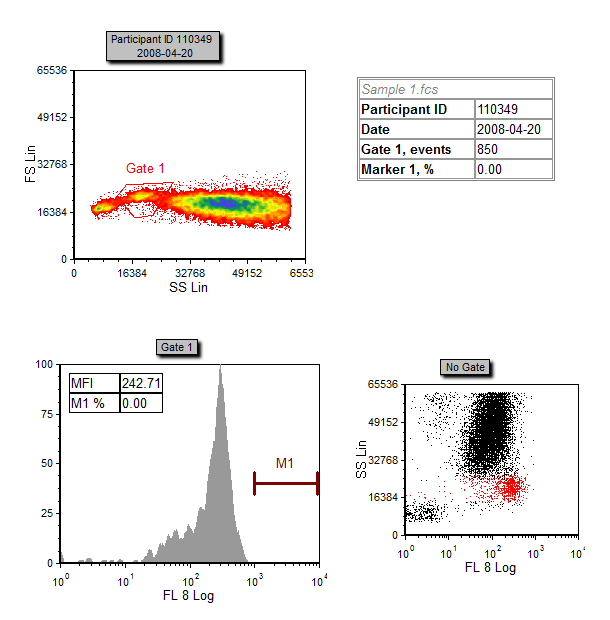
Figure T10.47 Example of the LabKeyServerExportTutorial.fey layout
5.Select the Batch→Batch Processing→Batch Actions command (Figure T10.48).

Figure T10.48 Selecting the Batch Actions command
6.Click on Export to LabKey under the Add Report category of the Batch Actions window (Figure T10.49).
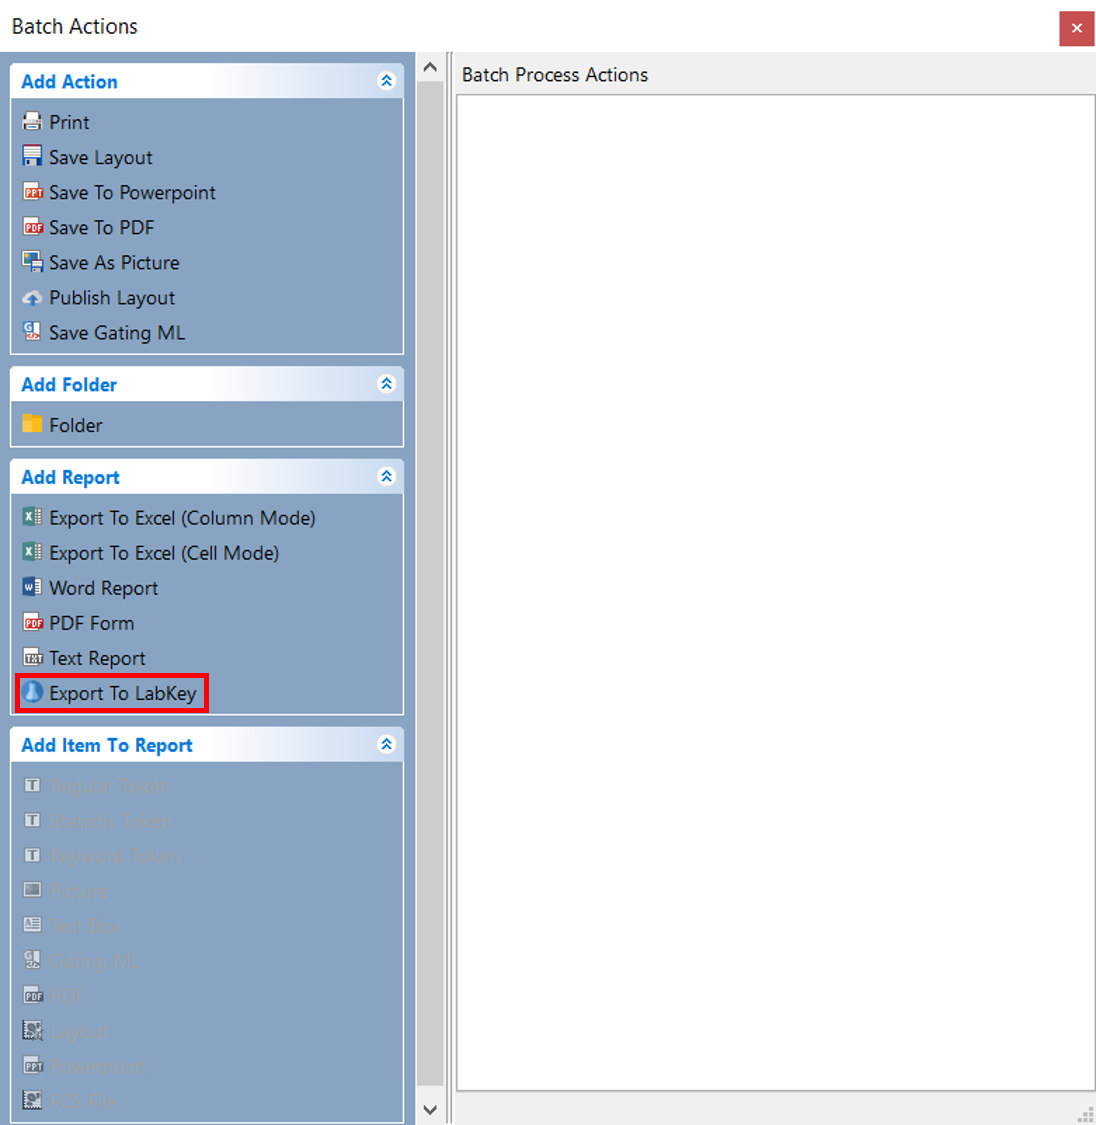
Figure T10.49 Adding a LabKey Report
The Export to LabKey Options dialog box opens (Figure T10.50).
7.Type (or copy and paste) the URL generated by LabKey Server into the LabKey Server URL field (Figure T10.50, ![]() ) of the Export to LabKey Options dialog box. This URL is generated automatically by LabKey Server and can be found by following the directions in the FCS Express Set Up: Prepare the FCS Express Report section of the accompanying LabKey tutorial.
) of the Export to LabKey Options dialog box. This URL is generated automatically by LabKey Server and can be found by following the directions in the FCS Express Set Up: Prepare the FCS Express Report section of the accompanying LabKey tutorial.
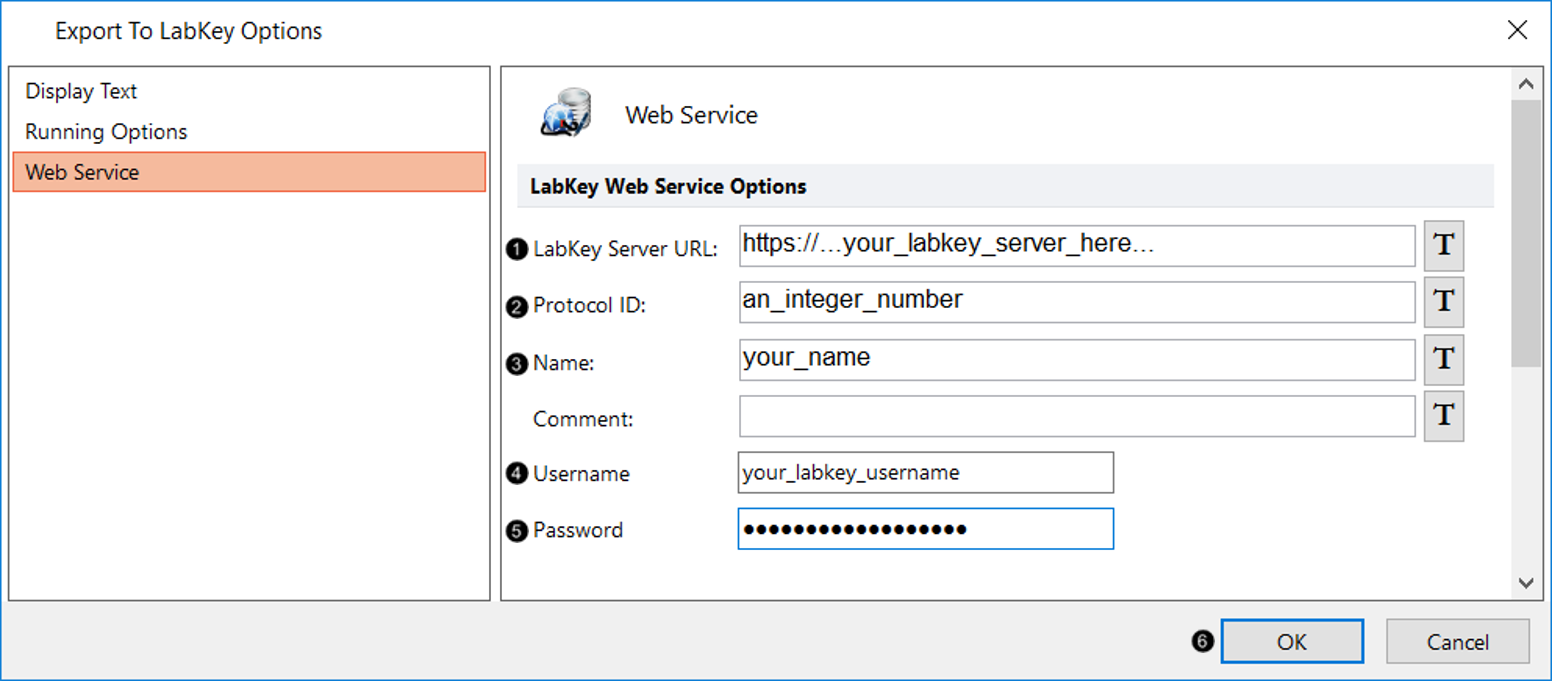
Figure T10.50 Export to LabKey Options dialog box
8.Type the Protocol ID number into the Protocol ID field of the Export to LabKey Options dialog box (Figure T109.50, ![]() ). The Protocol ID is an integer generated automatically by LabKey Server and can be found by following the directions in the FCS Express Set Up: Prepare the FCS Express Report section of the accompanying LabKey tutorial.
). The Protocol ID is an integer generated automatically by LabKey Server and can be found by following the directions in the FCS Express Set Up: Prepare the FCS Express Report section of the accompanying LabKey tutorial.
9.Type your name into the Name field of the Export to LabKey Options dialog box (Figure T10.51, ![]() ). This entry will be shown as the "Assay Id" in the table of Experimental Runs in LabKey Server.
). This entry will be shown as the "Assay Id" in the table of Experimental Runs in LabKey Server.
10. Type the email address you used to register with LabKey Server in step 1 into the Username field (Figure T10.51, ![]() ).
).
11. Type the password you used to register with LabKey Server in step 1 into the Password field (Figure T10.51, ![]() ).
).
12. Click OK to close the dialog window (Figure T10.51, ![]() ).
).
13. Highlight the Participant ID Token in the second column of the Table in the Layout (Figure T9.44, red outline) so that the Token text ("110349") appears white.
14. Drag and drop the highlighted Token on top of the Export to LabKey action which has just appeared in the Batch Actions window (Figure T10.51, red arrow).

Figure T10.51 Dragging and dropping Tokens from the Table into the Batch Actions Window
15. Repeat steps 13 and 14 for the next three Tokens in the Table (i.e. Date, Gate 1 events, and Marker 1, %) (Figure T10.51, remaining table values).
Note that you can also drag drop the whole table directly on top of the Export to LabKey action. In this case, the file name "Sample 1.fcs" will also be included in the list of Export to LabKey items.
16. Double-click on the item Keyword: $PARTICIPANTID for Plot #3, overlay #1 in the list of Export to LabKey items (Figure T10.52, blue highlighted text).

Figure T10.52 Export to LabKey Batch Action with Tokens added to Report
The Export To LabKey options window will appear.
17. Click on the Field category on the left (Figure T10.53, red arrow).
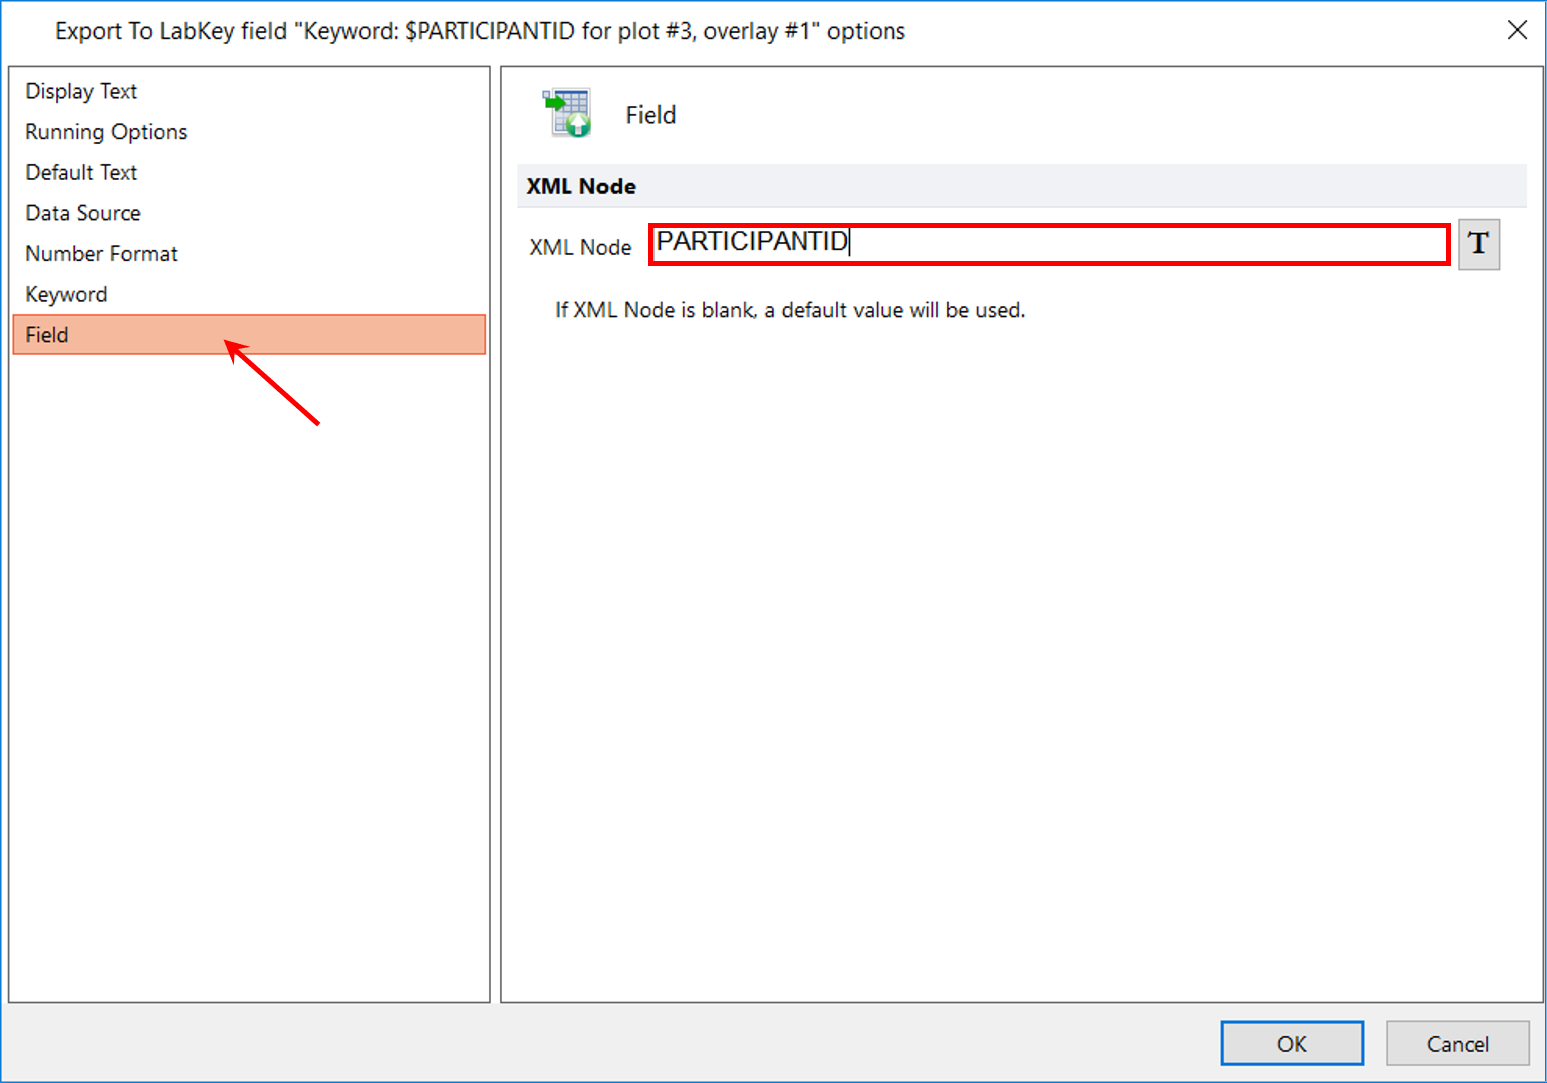
Figure T10.53 Entering text into the XML Node Field for Participant ID Token
18. Type the text "PARTICIPANTID" in the XML Node field (Figure T10.53, red outline). The XML Node field ensures that this data is exported to the correct Data Field in LabKey Server.
19. Click OK.
20. Repeat steps 16-19 for the next three items in the Export list (see bullets below for remaining tokens). In the XML Node field (step 18), type "DATE", "Events", and "Percent", respectively.
▪ Keyword: $DATE for Plot #3, overlay #1
▪ Statistic: # of Events for 3 - Density -Sample 1.fcs (SS Lin vs. FS Lin), overlay #1, gate Gate 1
▪ Statistic: % of gated cells for 4 - Histogram - Sample 1.fcs (FL 8 Log), overlay #1, M1
21.Click on the Export to LabKey action in the Batch Actions window (Figure T10.54, blue highlighted text).
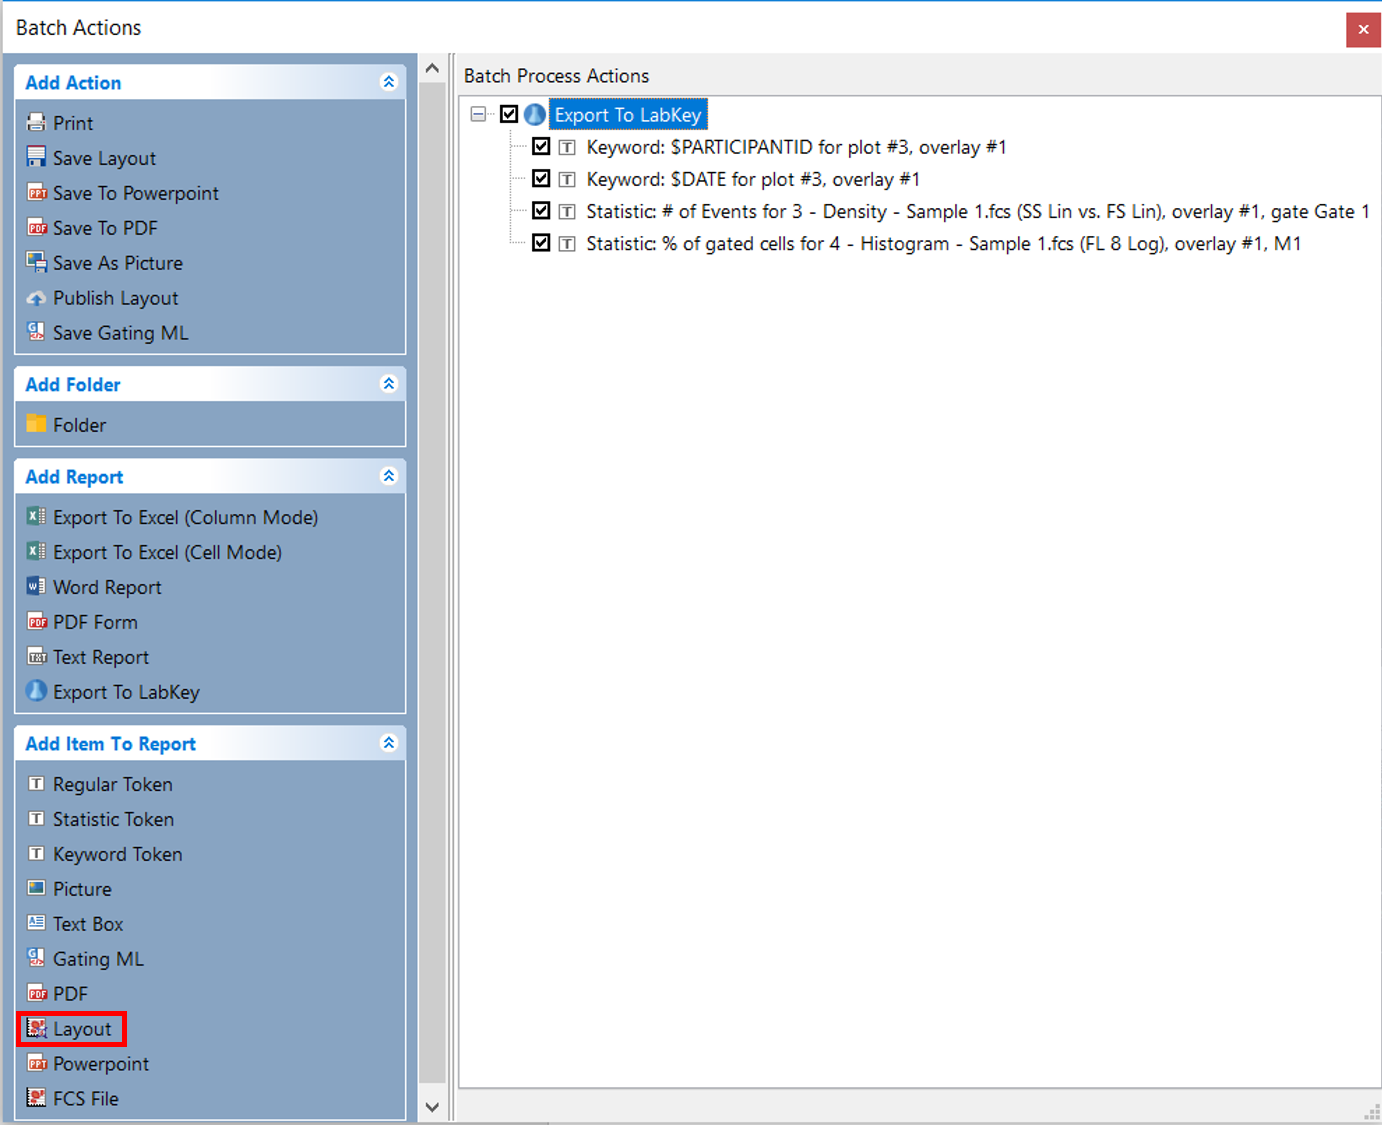
Figure T10.54 Adding Layout to the LabKey Report
22. Click Layout under the Add Item to Report category of the Batch Actions window (Figure T10.54, red outline). Leave the default option in the Layout category so that the Layout is exported linked to your data files.
23. Click on the Field category on the left of the dialog window which opens (Figure T10.55, red arrow).
24. Type "FEY" in the XML Node field and click OK (Figure T10.55, red outline).
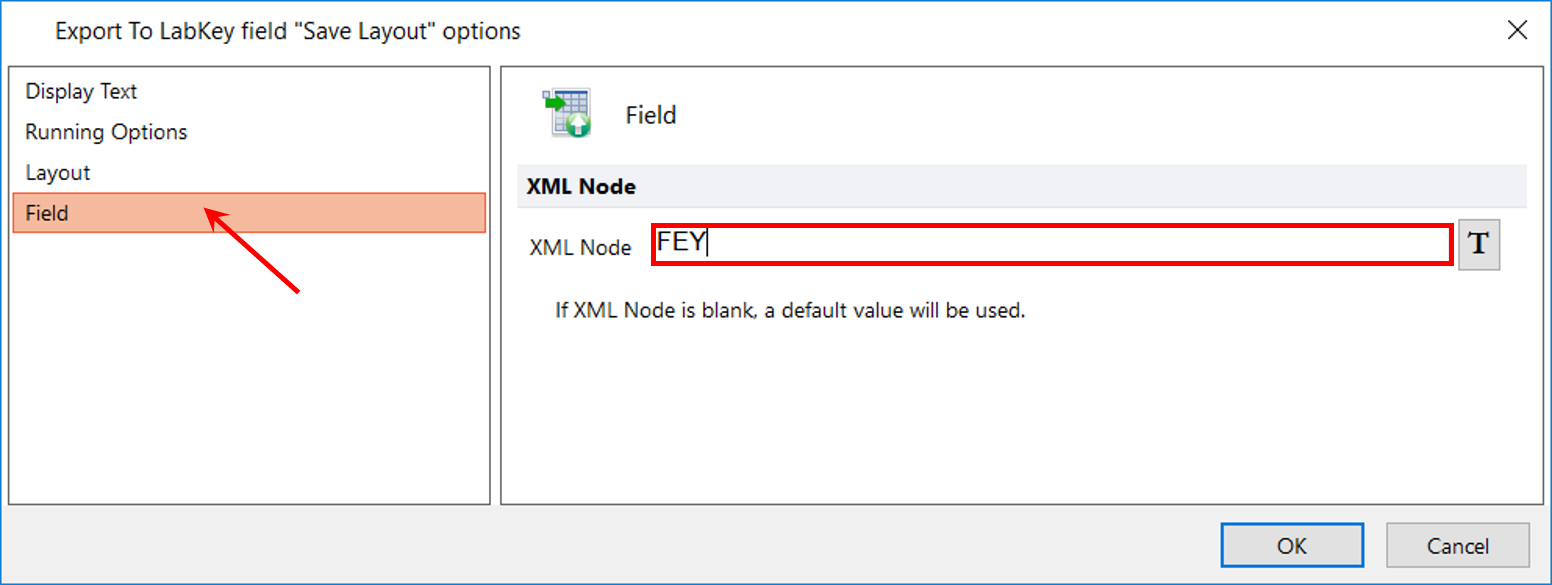
Figure T10.55 Entering text into XML Node Field for Layout
25. Click on the FCS File under the Add Item to Report category of the Batch Actions window (Figure T10.56).
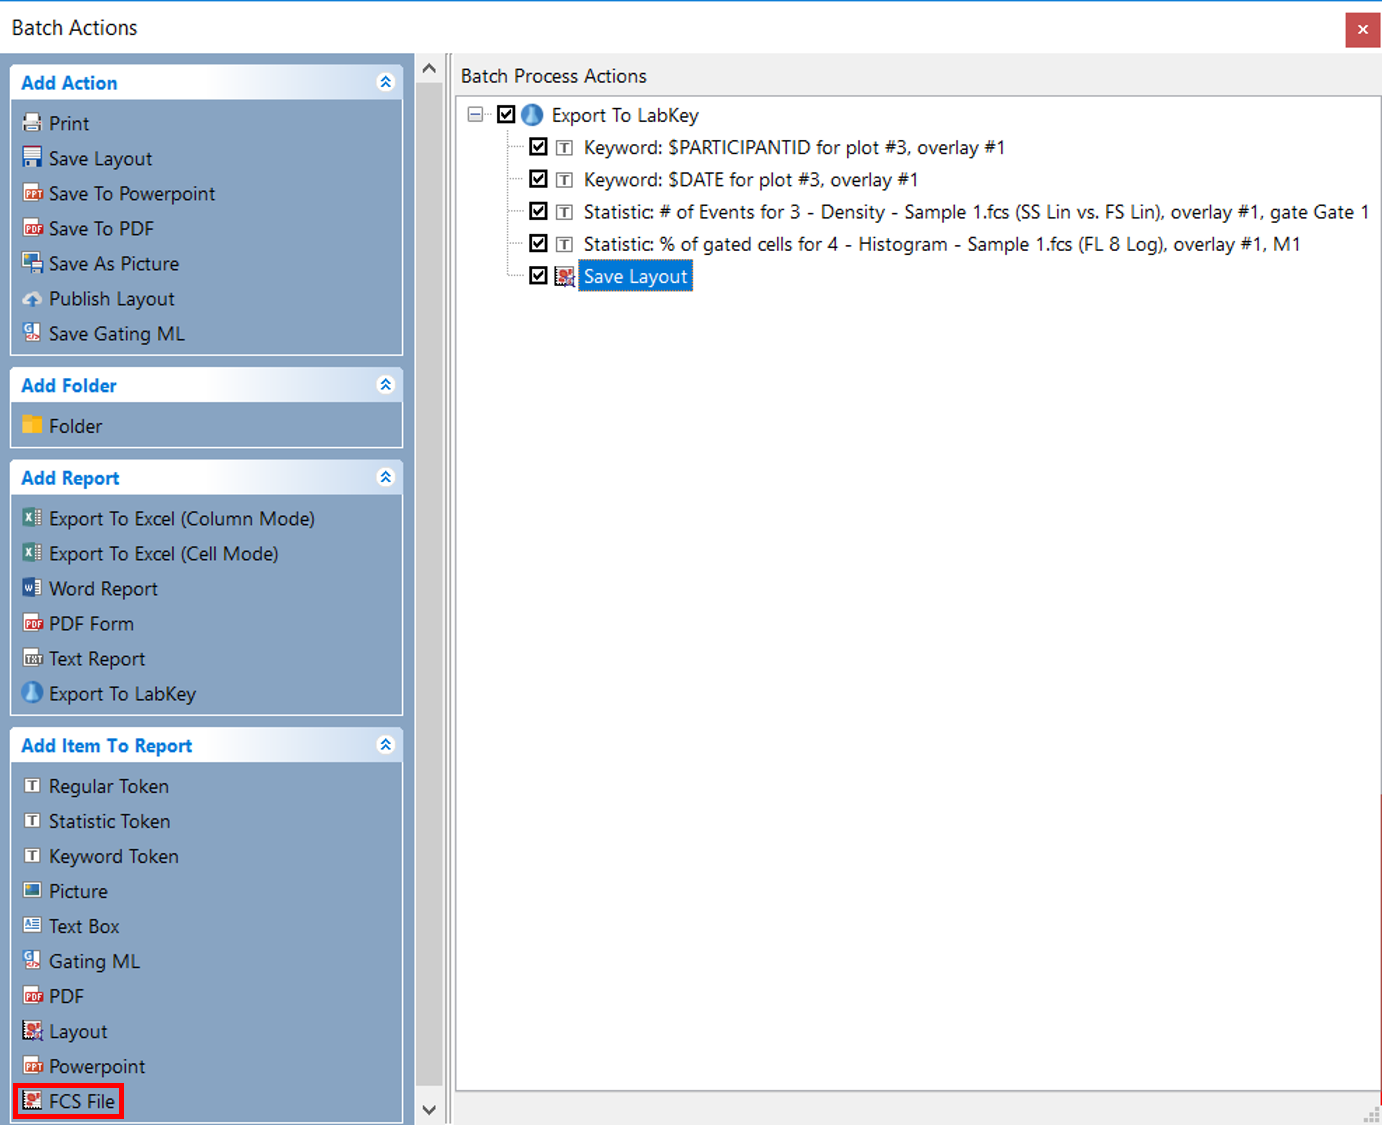
Figure T10.56 Adding FCS File to Labkey Export
26. Confirm 3-Density-Sample1.fcs(SS Lin vs. FS Lin) is selected under Select a Plot to specify it as the Data Source for the FCS file to be exported (Figure T10.57, blue highlighted text).
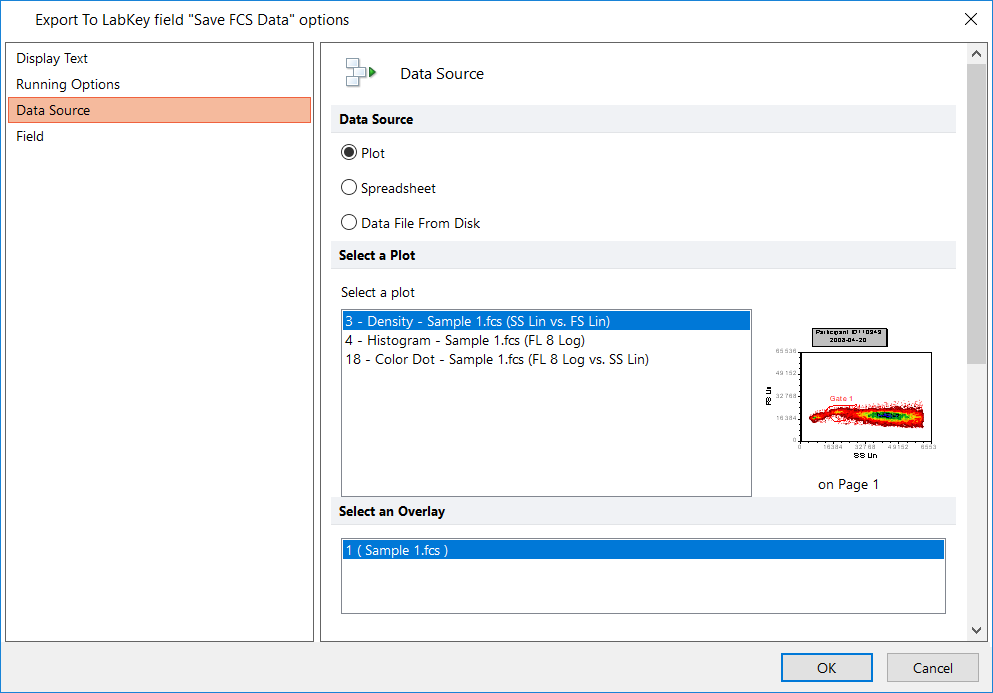
Figure T10.57 Data Source Options for exported FCS file
27. Click on the Field category on the left of the dialog window (Figure T10.58, red arrow).
28. Type "FCS" in the XML Node field (Figure T10.58, red outline).
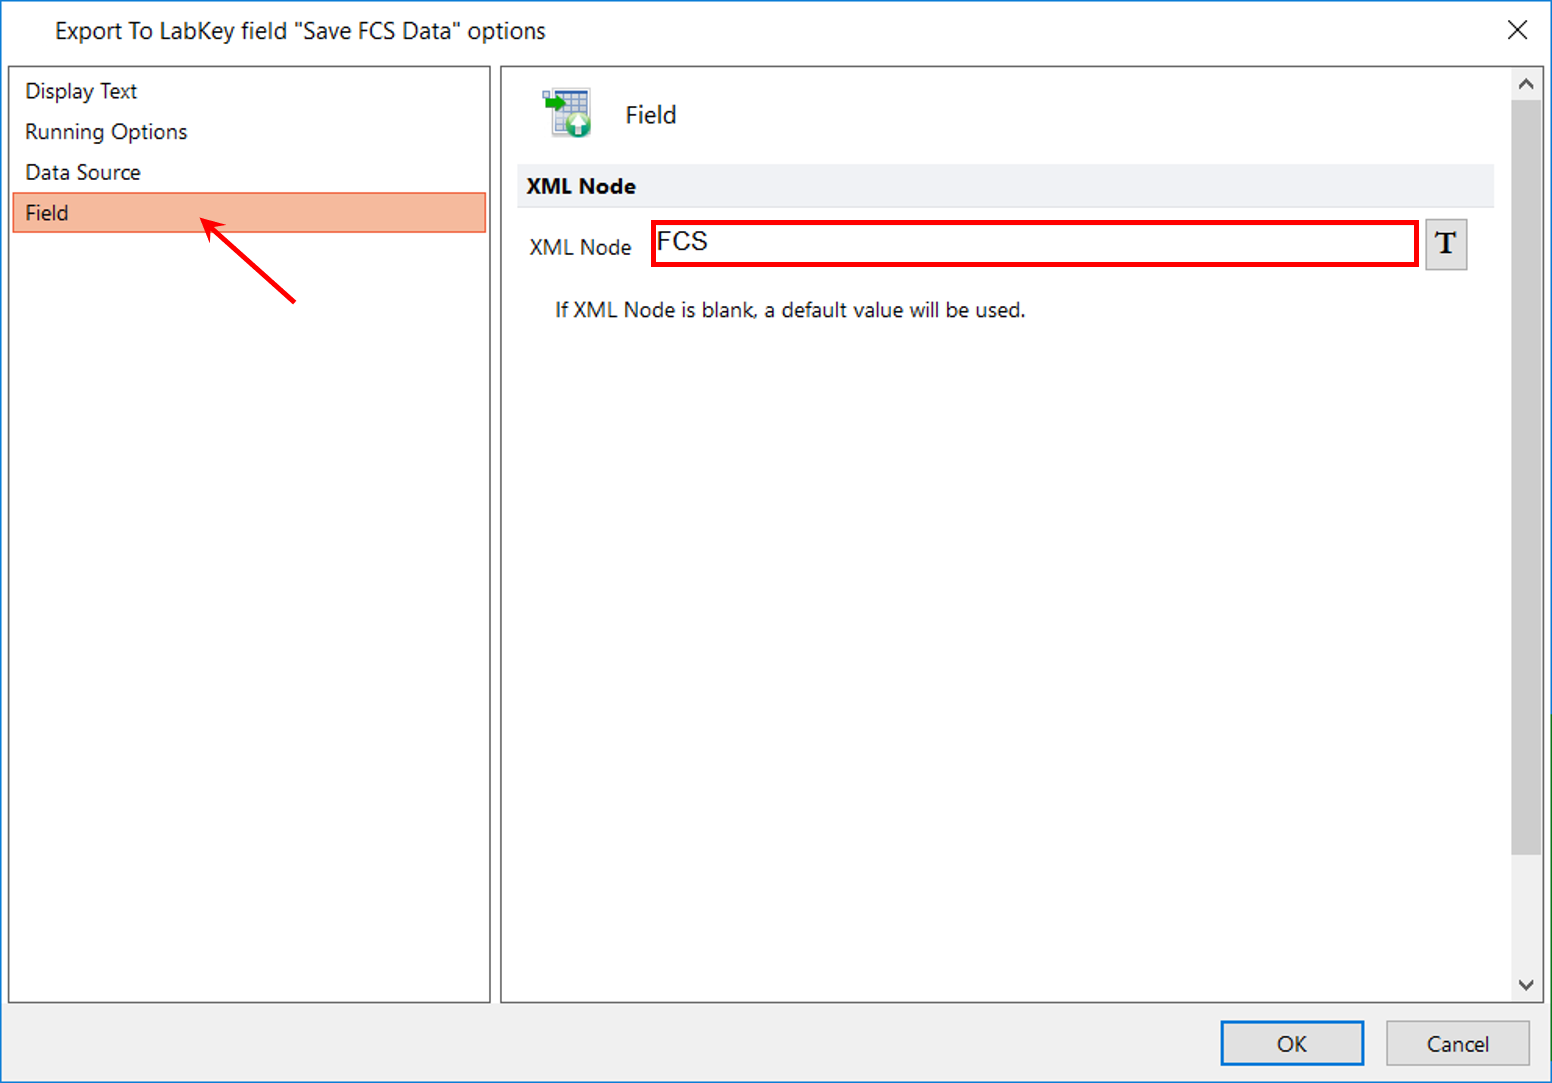
Figure T10.58 Entering text into the XML Node Field for FCS File
29. Click OK to close the dialog window (Figure T10.58).
30. Click Picture under the Add Item to Report category of the Batch Actions window (Figure T10.59, red outline).
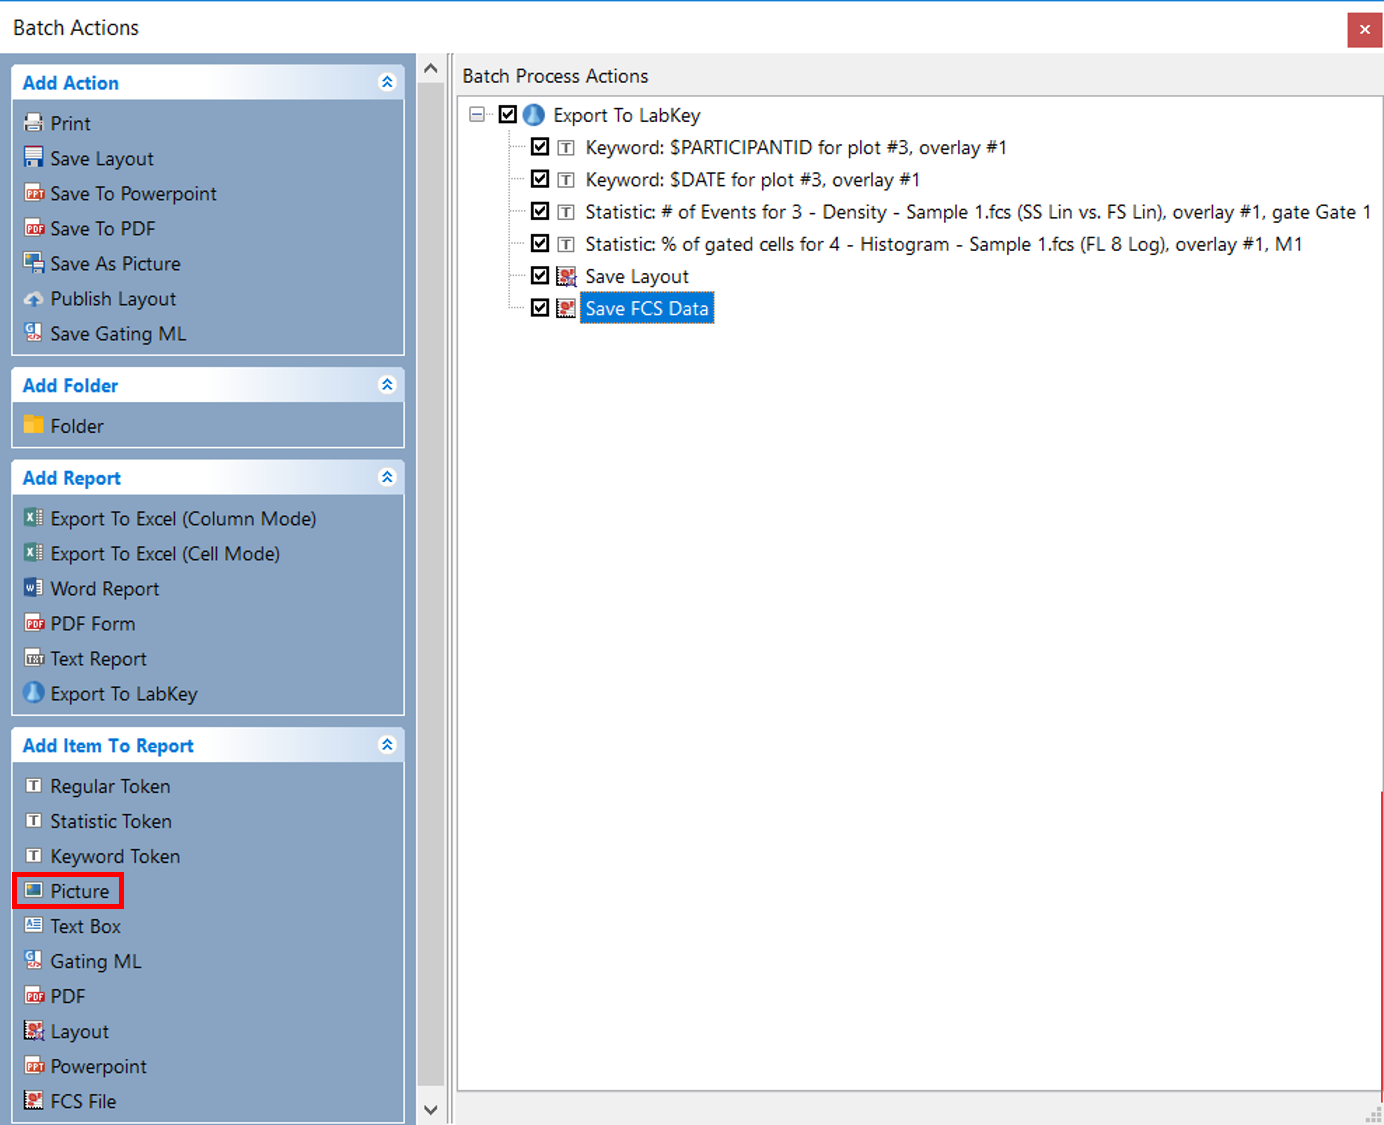
Figure T10.59 Adding Picture to Labkey Export
31. Select JPEG from the Format drop-down menu at right, in the window that opens (Figure T10.60, red outline).
32. Select 4-Histogram - Sample1.fcs (FL8 Log) under Select a plot (Figure T10.60, red arrow).
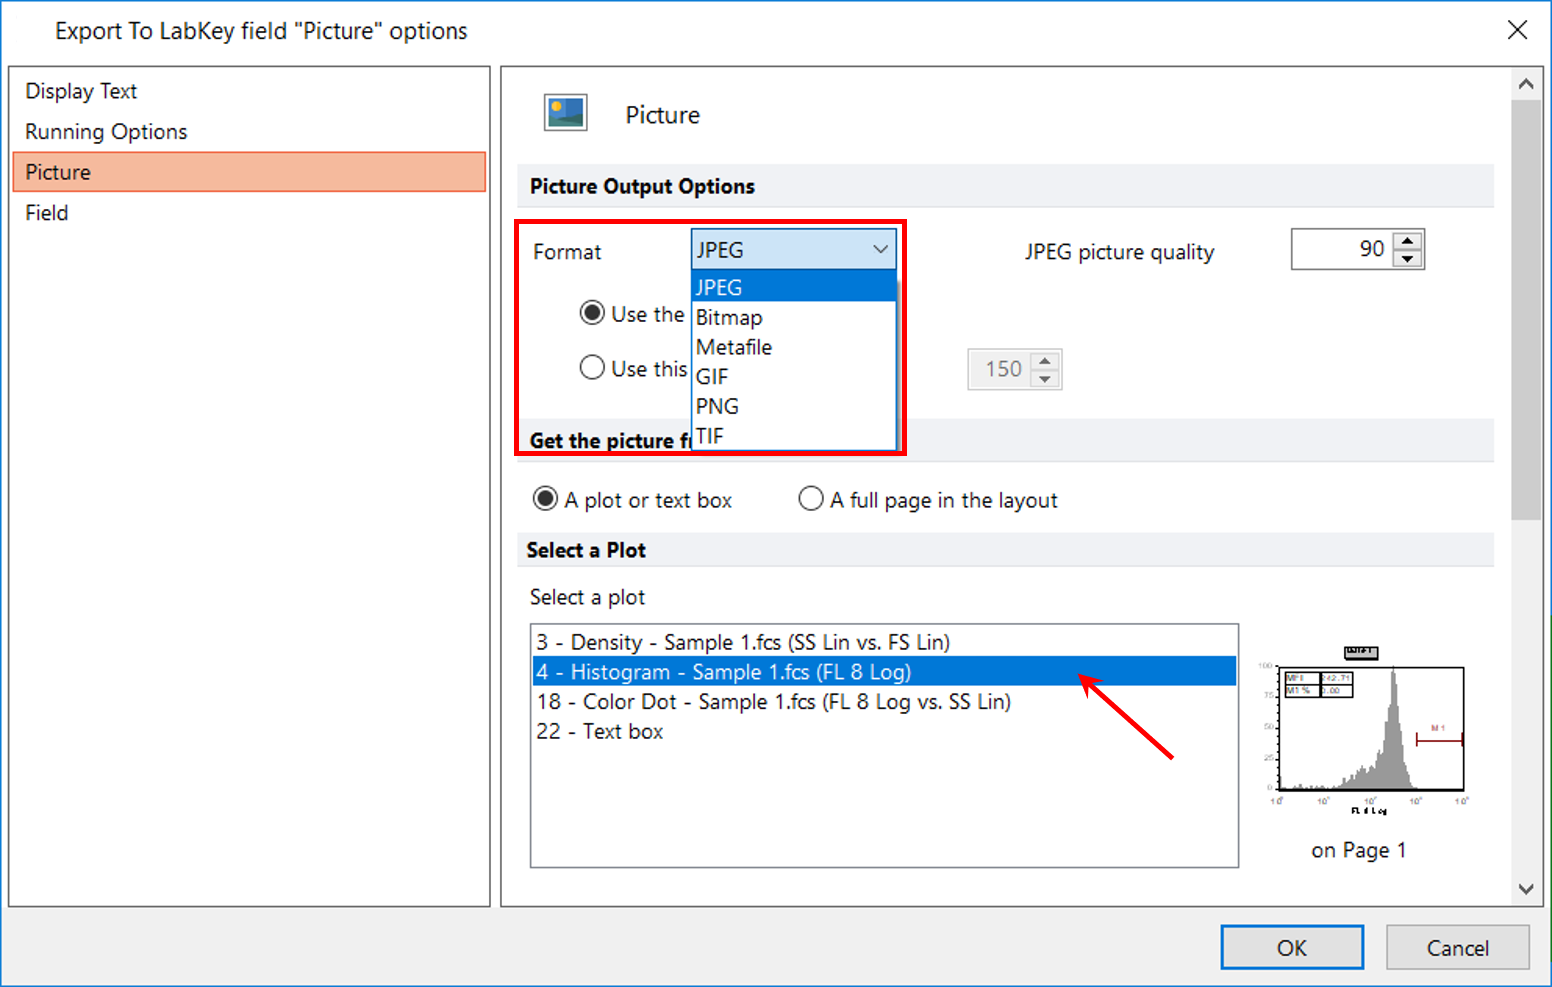
Figure T10.60 Setting Format and Plot to Use for Picture in Labkey Export
33. Click on the Field category on the left of the dialog window (Figure T10.61, red arrow).
34. Type "JPEG" in the XML Node field (Figure T10.62, red outline)
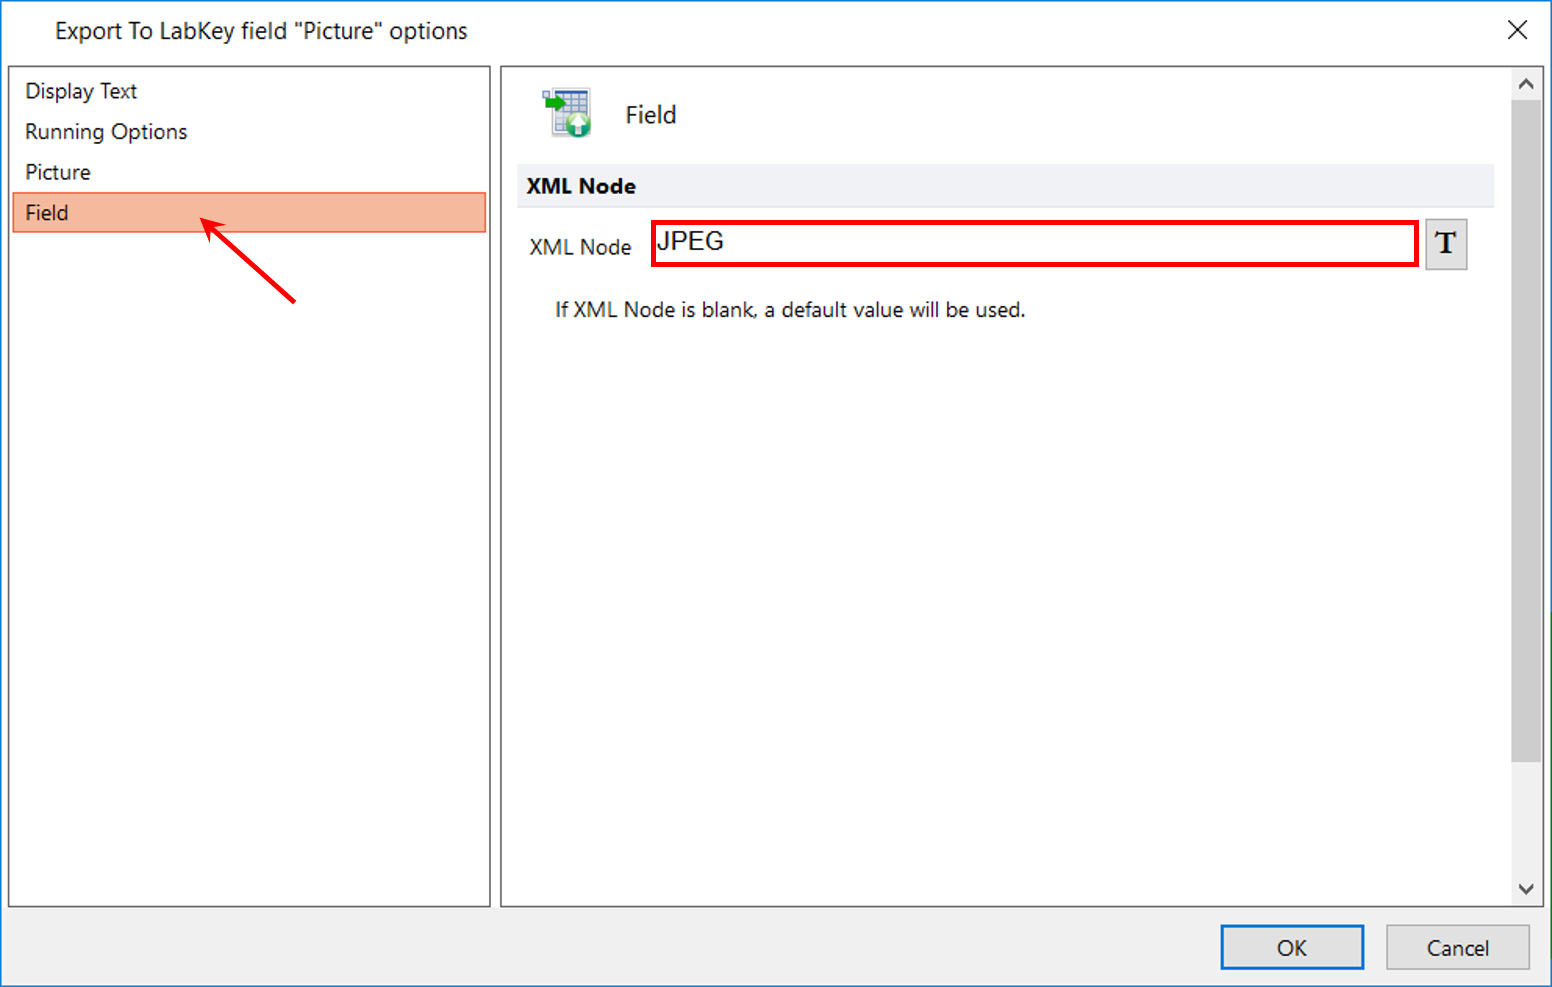
Figure T10.61 Entering text into the XML Node Field for Picture
35. Click OK to close the dialog window (Figure T10.61).
36. Click the Batch tab→Batch Processing group→Run or Rerun command (Figure T10.62). FCS Express will export the items to the LabKey Server now.

Figure T10.62 Running the Batch Process
37. Follow the directions in the View the Exported Data section of the accompanying LabKey Server tutorial to view the data you have exported from FCS Express to LabKey Server.
You have now set up a LabKey Report in the Batch Actions window from within FCS Express. You have added Keyword and Statistic Tokens, and files including an FCS Express Layout, FCS files, and pictures to the LabKey Report. Please see the accompanying LabKey Server tutorial for more information on sharing your flow cytometry analysis with your colleagues via LabKey Server.
