Merging / Concatenating FCS Files Via Batch Export - Use Case Example
Here we will present a use case example for Merging/Concatenating Data Files . In the example, files from a titration experiment will be concatenated. Briefly, each sample has been stained with a different dilution of the antibody of interest (e.g. CD3 FITC). The file resulting from file merging will then be loaded into FCS Express for further analysis. Both the File Identifier Column and the Classification File Identifier Column will be created in this example. Of course, the user can decide to create either one or both the above-mentioned Identifier Columns.
1. Select Data tab→Save/Load Data→Save/Merge from Files from the Ribbon. The Save/Merge from Files dialog will open.
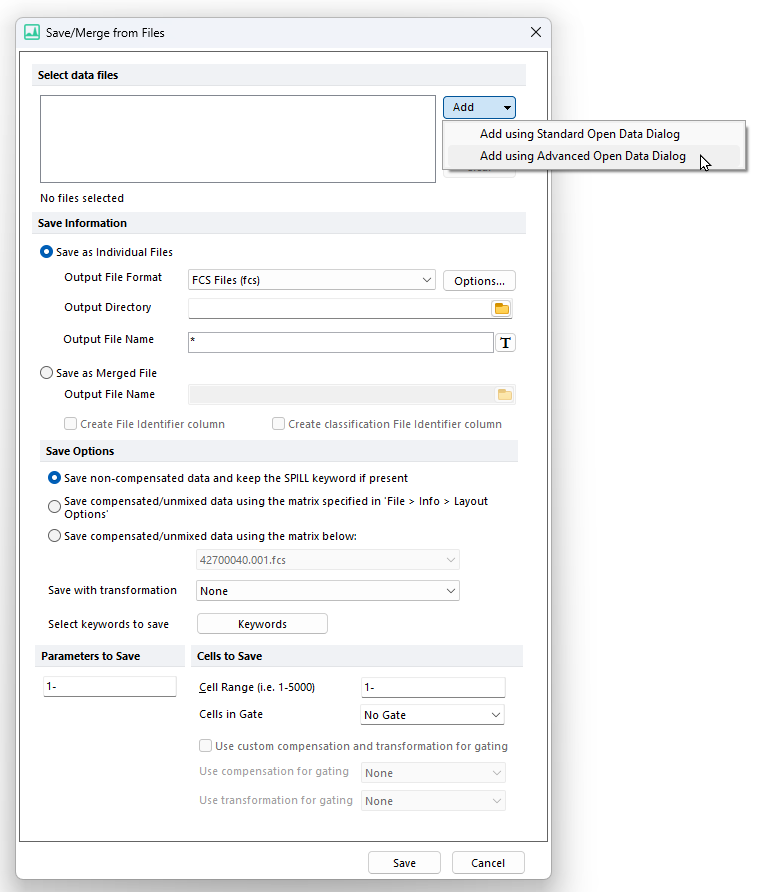
2. Click on Add from the Select Data File to Export section of the dialog→ Add using Standard Open Data Dialog or Add using Advanced Open Data Dialog (Figure 14.17). Note: The Advanced Data Dialog allows to select files from the Data List.

Figure 14.16 The Save/Merge from Files dialog displaying the different Add options.
3. Browse and multiple select the files to merge.
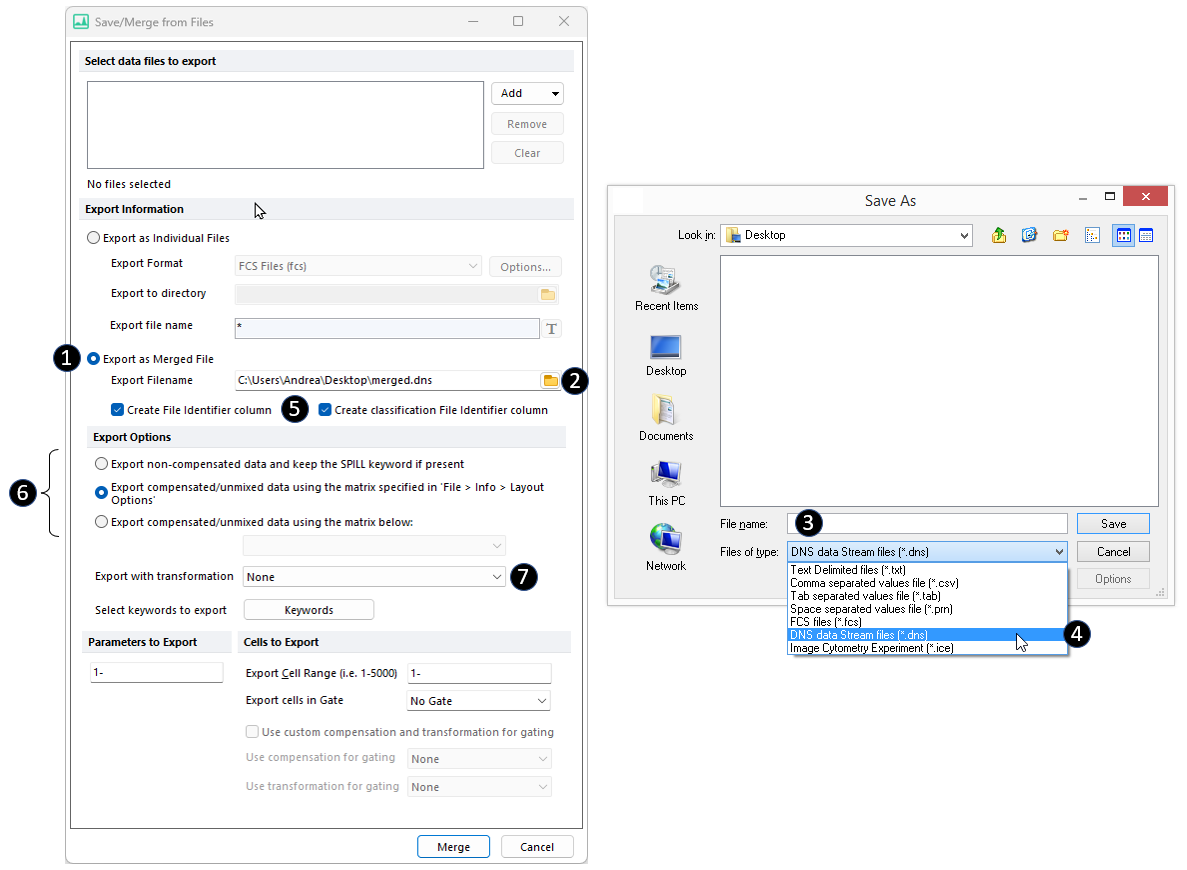
4. Check the Save as Merged File radio button (![]() in Figure 14.18).
in Figure 14.18).
5. Browse to a location in the Output Filename field for the output file (![]() in the figure below) and select an output file name (
in the figure below) and select an output file name (![]() in the figure below).
in the figure below).
a. Select DNS data Stream files as File of type (![]() in the figure below). Note that this file extension is required to create the Classification File Identifier Column. If only the File Identifier Column has to be created, FCS files (*.fcs) can be selected as File of type.
in the figure below). Note that this file extension is required to create the Classification File Identifier Column. If only the File Identifier Column has to be created, FCS files (*.fcs) can be selected as File of type.
b. Note: When the File Identifier Column is created, in order for the File Identifier parameter scaling to display correctly, please ensure that the default FCS Saving Option for Data Format is set to Single (default). Note that this option is only available when FCS files (*.fcs) is selected as File of type. When working with DNS files, the plot axis displaying the File Identifier parameter may be manually customized with regards to the Min/Max Resolution via the Axes formatting dialog.

Figure 14.17 The Save As dialog allows to specify the location, the name and the type of the oputput file.
6. Check the Create File Identifier Column and the Create classification File Identifier Column check boxes (![]() in the Figure above).
in the Figure above).
7. Select which Compensation and which Transformation to apply to the data before saving it (![]() and
and ![]() respectively in the Figure above). For more details about these options, please refer to the Saving FCS File Data from Multiple Files: Batch Export / Merging/ Concatenation chapter.
respectively in the Figure above). For more details about these options, please refer to the Saving FCS File Data from Multiple Files: Batch Export / Merging/ Concatenation chapter.
8. Click Merge. The selected file will be merged/concatenated and the corresponding merged file will be saved in the location specified in Step 5. Note that files are merged/concatenated in the same order in which they are listed in the Select data files to export field (Step 2).
The merged file can be now loaded into the layout using 1D plots, 2D plots, Plate Heat Maps and Data grids.
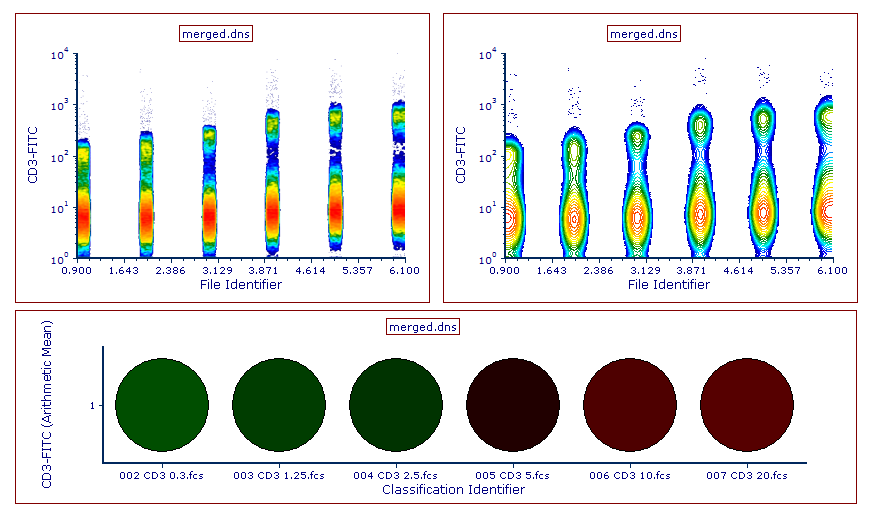
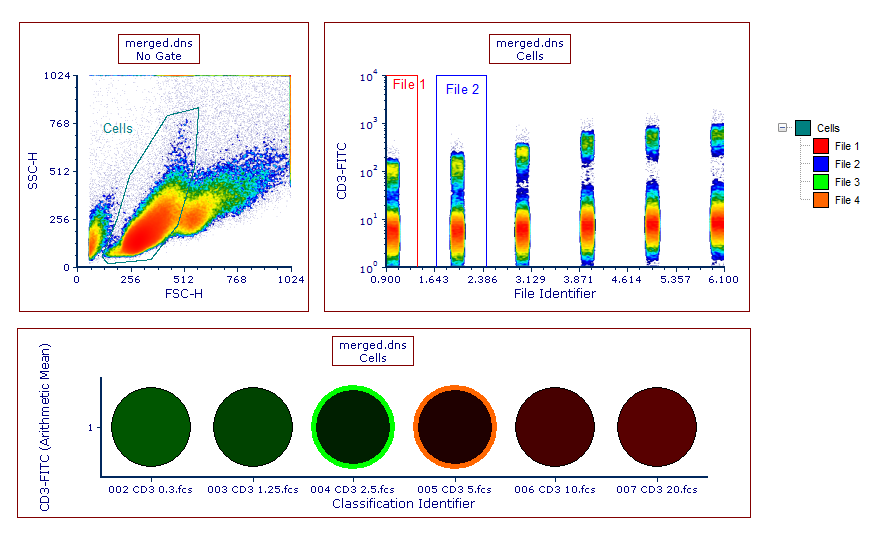
Below is an example of a Density plot, Contour plot and Plate Heat Map with the newly merged file loaded. Note that the File Identifier Column and Classification File Identifier Column created in Step 6 above can now be used to create gates and well gates and thus to virtually separate the different merged files (Figure 14.19).

Figure 14.18 An example of Density (left), Contour (right), and Plate Heat Map (bottom) plots of the file resulting from the merge.
Plots displaying the File Identifier Column and file-specific gates can be both integrated in any of your layout as they are compatible will all functionality of FCS Express (Figure 14.20), including Well Gates.

Figure 14.19 An example of file-specific gates drawn on the file resulting from the merge.
Please see also the Antibody Titration Spreadsheet use Cases 2 to see how to use spreadsheet for this type of assay.
