Exporting FCS File Data from Multiple Files: Batch Export / Merging/ Concatenation

Contents
You can save data from multiple files consecutively, or merged multiple files into a single file, using Save/Merge from Files (Data tab→Save/Load Data→Save/Merge from Files). The process is also sometimes referred to as concatenation.
Note: Utilizing the Save/Merge from Files tool will create a new data file. If saving a new data file is not necessary, users may also choose to merge/concatenate data on the fly utilizing the Adding Merged Files to the Data List feature.
The Save/Merge from Files dialog (Figure 14.14) can be accessed by selecting the Data tab→Save/Load Data→Save/Merge from Files command.

Figure 14.13 Save/Merge from Files dialog
The Save/Merge from Files dialog allows users to define the following options:
Select data file to export |
Click Add to select the files to export. You can remove files from the export list by clicking the Remove button (or clear all files with the Clear button).
|
Save as Individual Files
or
Save as Merged File
|
Use the Save as Individual Files radio button to export all files separately and Save as Merged File to export all files merged into a single file.
The options, with respect to file types, and the choices for data to export, are similar to those when exporting data from a single file.
When Save as Individual Files is selected, the output file name can contain the original file name in it, by using the asterisk. E.g. if a file is named Sample1.fcs and the output file name specified in the Output file name field is Exported_* , the actual output file name will be Exported_Sample1.fcs.
When Save as Merged File is selected, you may check the Create File Identifier column box and/or the Create Classification File Identifier Column box, which both allow each event in the merged file to be traced back to the original file (see details below).
Create File Identifier column adds a new column (parameter) to the merged output file. The values for the File Identifier parameter are incremented for each file so that events in the merged file may be traced back to and gated on the original files. In the example below (Figure 14.15), a merged output file has been created from a data set containing four original files. Three separate gates have been drawn on events originating from files 1, 2, and 3 to allow for separate analysis of these populations.
Note: In order for the File Identifier parameter scaling to display correctly, please ensure that the default FCS Saving Option for Data Format is set to Single (default).  Figure 14.14 Merged file with File Identifier Column, with separate gates drawn on events from original files
Create Classification File Identifier Column adds a new column (parameter) to the merged output file. The values for the Classification File Identifier parameter are text labels matching the filename to which each event belongs to allowing each event in the merged file to be traced back to and gated per file. The difference between the File Identifier parameter and Classification File Identifier is that the Classification File Identifier parameter is compatible with Plate Heat Map plots. Thus, each original file may be represented as a well of an Plate Heat Map plot. Moreover, the Classification File Identifier parameter reports the actual file name instead of a number as is the case with the File Identifier parameter.
Please note that to create the Classification File Identifier parameter, the DNS data Stream files (*.dns) format must be selected as the file of type for the output merged file (see the Merging / Concatenating FCS Files - Use Case Example chapter for more information on how to use this feature).
In the example below (Figure 14.16), a merged output file has been created from a dataset containing four files. Three separate well gates have been drawn on the wells of the Plate Heat Map plot representing files 1, 2, and 3, to allow for separate analysis of these populations.
 Figure 14.15 Merged file with Classification File Identifier Column, with separate well gates drawn on the Plate Heat Map plot to specifically select events from original files
See an example of the Multiple File Merging feature in the Merging / Concatenating FCS Files - Use Case Example.
|
Save Options |
Allows you to select whether data should be exported as compensated data or as raw data with the compensation saved apart as a keyword (default is None).
Possible choices are: •Save non-compensated data and keep the SPILL keyword if present: data are saved as raw (uncompensated) data and the compensation is maintained as a keyword in the exported file. •Save compensated/unmixed data using the matrix specified in "File > Info > Layout Options": the compensation/unmixing defined base on the Layout Options will be applied to the data. Data will thus be exported as compensated/unmixed data. The original compensation associated with the data file, if present, is then saved just for tracking purposes in a non-standard keyword called ORIGINAL_SPILL. The original $SPILL keyword saved at acquisition, if present, is removed. •Save compensated/unmixed data using the matrix below: A further choice will be presented for all of the individual compensation/unmixing definitions currently accessible in the layout. The compensation/unmixing definition selected will be applied to the data exported. Data will thus be exported as compensated/unmixed data. The original compensation associated with the data file, if present, is then saved just for tracking purposes in a non-standard keyword called ORIGINAL_SPILL. The original $SPILL keyword saved at acquisition, if present, is removed.
Note: When merging multiple data files, if a Data Specific Gate was used to select the Cells to Export, the compensation applied to the merged output file must be the same compensation used for the Data Specific Gate. In this case, it is recommend to select Default in the Export with Compensation option and set the compensation used to create the Data Specific Gate as the Default for the layout (see Applying Compensation Definitions for more information on how to set a compensation as Default for a layout).
|
Save with transformation |
Allows users to select the Transformation that will be applied to the data before exporting. Default is None.
|
Cells to Save
|
The options available in this section allows users to define how saved events should be selected.
•Cell Range. Only the events in the specified range will be exported. Default is all cells. The events exported will be those as indicated in the Cell Range field, for instance 1-4000 will export event number 1 through event number 4000, and will not export a randomly generated, or interval defined, set of events.
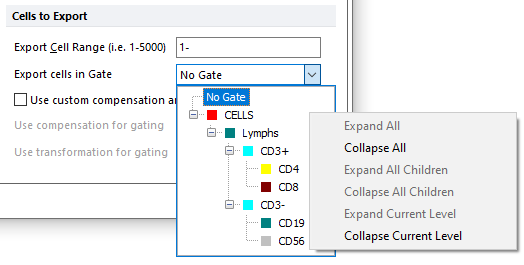
•Cells in gate. Only the events within the selected gate will be saved. Default is No gate. When selecting a gate, the user will be able to visualize the gate hierarchy. Using the right-click menu the user can Expand All, Collapse All, Expand All Children, Collapse All Children, Expand Current Level, or Collapse Current Level to making it easy to navigate through the hierarchy to find the desired gate.
Note: if both a Range and a Gate are selected, the Range filter will be applied first. E.g. if the Range is set to "1-4000" and Gate is set to "Gate 1", only the Gate 1 cells within the first 4000 events will be exported.
Use custom compensation and transformation for gating. This option allows users to define whether the gate defined above should be applied using a compensation or a transformation different than the ones selected in the Export with compensation and in the Export with transformation options.
Note that the option does not define if a compensation or a transformation should be applied to the exported data (this is done through the Export with compensation option described below), but only if the filter gate should be applied to compensated/transformed data.
If the Use custom compensation and transformation for gating option is not checked, the setting defined in the Export with compensation and in the Export with transformation options will be applied.
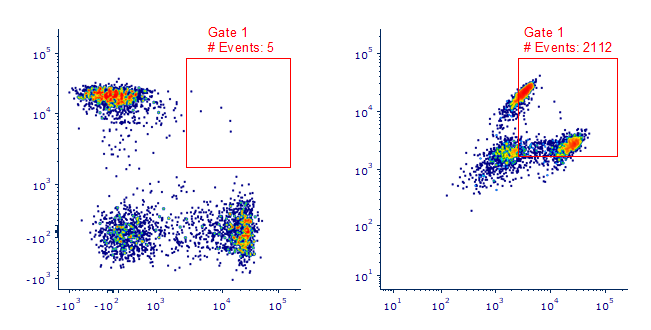
Examples In the examples below, events within a gate of interest, called Gate 1, will be exported from a file of interest.
Example #1 The Use custom compensation and transformation for gating option is unchecked, no custom compensation/transformation is used for gating, and the setting defined in the Export with compensation and in the Export with transformation options will be applied to both the exported values and the gating.
•if the Export with compensation is set to use a compensation (e.g. a specific compensation or the Default one), Gate 1 will be applied to the compensated dataset (left plot below) and 5 events will be exported. In the exported file, events will also be compensated using the compensation selected in the Export with compensation drop-down menu.
•if the Export with compensation is set to None, Gate 1 will be applied to the non-compensated dataset (right plot below) and 2112 events will be exported. In the exported file, events will be saved as raw data. If the input data contains a $SPILL keyword, it will be maintained.
Example #2 The Use custom compensation and transformation for gating option is checked, the setting defined in the Export with compensation and in the Export with transformation options will not be used for gating (i.e. setting defined in the Export with compensation will only be applied to the exported gated events).
•if a compensation is selected in the Use custom compensation for gating option, then Gate 1 will be applied to the compensated dataset (left plot below) and 5 events will be exported. In the exported file, events will be compensated or not based on the Export with compensation setting.
•if None is selected in the Use custom compensation for gating option, then Gate 1 will be applied to the non-compensated dataset (right plot below) and 2112 events will be exported. In the exported file, events will be compensated or not based on the Export with compensation setting.
Note for Data Specific Gates. A Data Specific Gate is specific for the dataset and the compensation use to create it. To use Data Specific Gates during Batch Export, the same compensation used to create the Data Specific Gate within the layout must also be used during the Batch Export. Setting the Export with compensation option to Default and unchecking the Use custom compensation and transformation for gating, will allow users to utilize data specific gates.
|
Parameters to Save |
Allows users to select the parameters to export. Default is all parameters.
Parameters can be specified by indicating the parameter numbers to export.
For example, if the first 4 parameters are only to be exported, enter 1-4.
If the user is interested non-adjacent parameters, the parameters can be listed, each separated by a comma.
For example, if the first, third, fifth and seventh parameters are being exported, enter 1,3,5,7.
|
Select keywords to save |
Allows users to select which keywords will be maintained or removed after the export. Default is to export all keywords.
|